Ground Beef Spring Rolls: 5 Heavenly Recipes to Try
 Save
Save
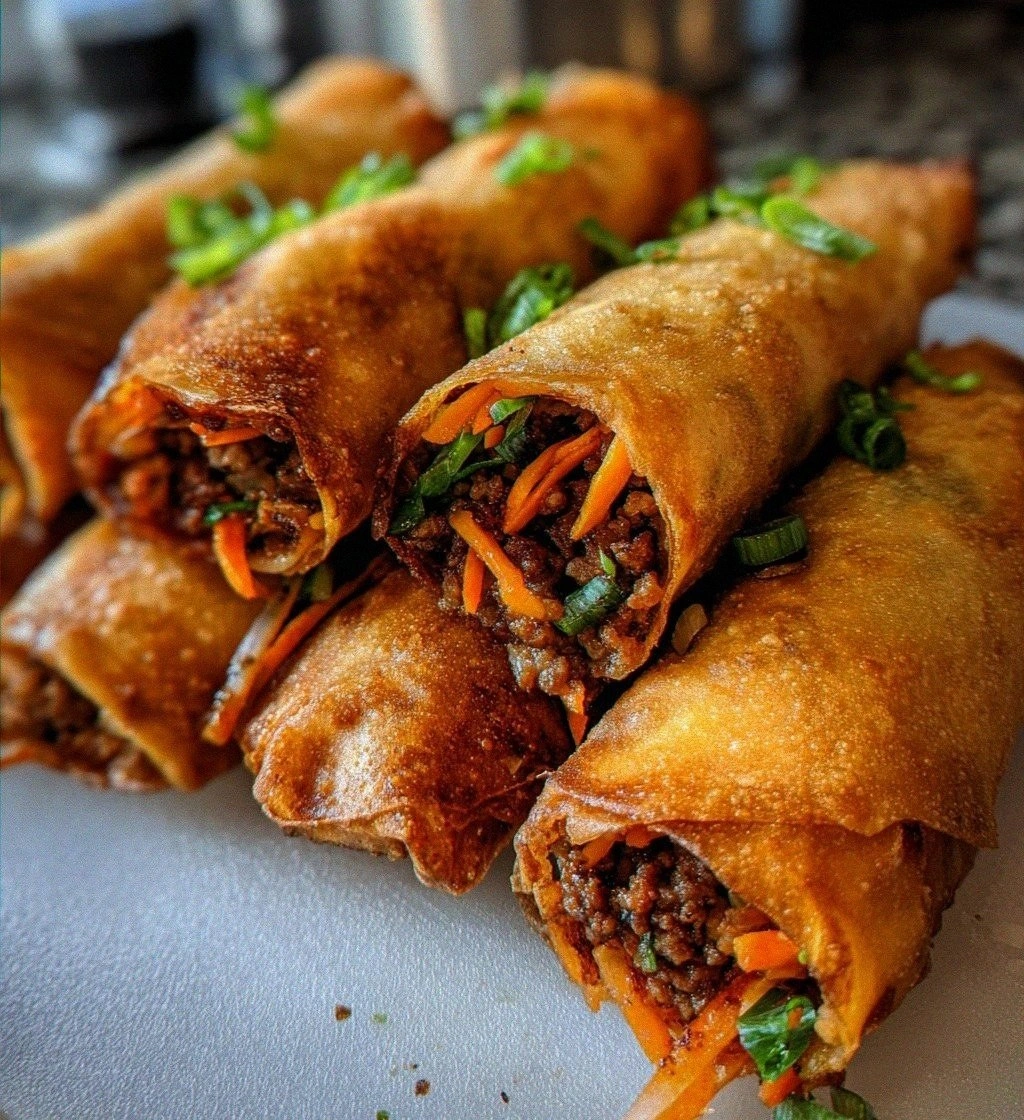
I still remember the first time I tried to make spring rolls in my tiny college kitchen. The pantry was half‑empty, the stovetop squeaked, and the only thing I had on hand was a bag of frozen spring‑roll wrappers and a pound of ground beef that I’d bought on a whim. As I heated the oil, a golden‑brown aroma rose like a promise, and when I finally lifted the lid, a cloud of fragrant steam hit me with hints of sesame, garlic, and a whisper of soy. The first bite was a crunchy, juicy revelation that made my heart skip a beat – a perfect marriage of textures that felt both familiar and exotic.
Since that night, ground beef spring rolls have become my go‑to crowd‑pleaser for everything from casual movie nights to impromptu dinner parties. There’s something magical about taking humble pantry staples and turning them into bite‑size parcels that burst with flavor. The crunch of the wrapper, the savory beef, and the fresh snap of carrots and cabbage create a symphony that dances on the tongue. And because they’re deep‑fried to a perfect amber hue, they’re irresistibly addictive – you’ll find yourself reaching for another before the plate is even empty.
What makes these rolls truly heavenly is the balance of simplicity and depth. You don’t need a culinary degree or a pantry full of exotic spices; just a few quality ingredients and a little love. The secret lies in the layering of flavors – the umami of soy, the nuttiness of sesame oil, and the bright bite of fresh aromatics. But wait, there’s a hidden trick that elevates the texture from good to unforgettable, and I’ll reveal it in the step‑by‑step section. Trust me, you’ll want to write that down.
Now, imagine serving these golden parcels on a platter, surrounded by a trio of dipping sauces, with your family’s eyes lighting up as they reach for the next bite. The excitement builds, the conversation flows, and you’re the hero of the kitchen. Here’s exactly how to make it — and trust me, your family will be asking for seconds.
🌟 Why This Recipe Works
- Flavor Depth: The combination of soy sauce and sesame oil creates a savory backbone that penetrates the beef, while the fresh vegetables add brightness and a subtle sweetness that keeps each bite interesting.
- Texture Harmony: The crisp, delicate wrapper contrasts with the juicy, tender ground beef filling, and the shredded carrots and cabbage provide a satisfying crunch that prevents the roll from feeling heavy.
- Ease of Execution: All the steps use simple techniques – sautéing, mixing, and frying – that even a beginner can master with a little patience and the right guidance.
- Time‑Smart: From prep to plate, the entire process takes under an hour, making it perfect for weeknight meals or last‑minute gatherings without sacrificing flavor.
- Versatility: You can swap the ground beef for pork, turkey, or even a plant‑based mince, and the wrappers can be baked instead of fried for a lighter version.
- Nutrition Boost: The inclusion of carrots and cabbage adds fiber, vitamins, and antioxidants, while the lean ground beef provides protein and iron, making these rolls a balanced snack.
- Ingredient Quality: Using an 80/20 beef ratio ensures juicy, flavorful meat, and fresh vegetables keep the filling bright and crisp, preventing sogginess.
- Crowd‑Pleasing Factor: Golden, crunchy, and packed with familiar flavors, these rolls appeal to kids and adults alike, turning any gathering into a festive feast.
🥗 Ingredients Breakdown
The Foundation
The star of our dish is 1 pound ground beef. I always reach for an 80/20 blend because the little bit of fat keeps the meat juicy and adds a buttery richness that plain lean beef can’t match. When you brown it, the fat renders and creates a flavorful base that carries the rest of the seasonings. If you’re watching calories, you can trim a little fat after cooking, but don’t skimp – the moisture is crucial for that melt‑in‑your‑mouth texture.
Next, we have 1 cup shredded carrots. Freshly shredded carrots bring a natural sweetness and a vibrant orange hue that makes the filling look as good as it tastes. Using a box grater or food processor gives you fine shreds that blend seamlessly with the meat, preventing large chunks that could break the delicate wrapper. If you’re in a pinch, pre‑shredded carrots work, but fresh always wins on flavor.
Aromatics & Spices
1 cup shredded cabbage adds crunch and a subtle peppery note that balances the richness of the beef. Green cabbage is ideal because its leaves are tender enough to shred fine yet sturdy enough to hold up during frying. When you toss it into the pan, it wilts just enough to release its juices without turning soggy.
2 green onions, chopped bring a sharp, slightly oniony bite that lifts the overall flavor profile. I love using both the white and green parts – the white adds depth while the green adds a pop of color and fresh aroma. If you’re out of green onions, a mix of shallots and chives can mimic the same bright flavor.
2 cloves garlic, minced are the secret behind the aromatic backbone. Fresh garlic releases a pungent, almost sweet aroma when sautéed, creating a depth that store‑bought garlic powder can’t replicate. Adjust the amount if you love garlic – just remember that a little goes a long way in a fried dish.
The Secret Weapons
1 tablespoon soy sauce delivers that essential umami punch. Low‑sodium soy keeps the salt level balanced while still providing a deep, savory note that ties the beef and vegetables together. If you want a slightly sweeter profile, add a splash of honey or brown sugar, but keep it subtle.
1 teaspoon sesame oil is a game‑changer. Just a dash infuses the filling with a nutty fragrance that makes the rolls instantly recognizable as an Asian‑inspired treat. Be careful not to overdo it – too much can overwhelm the other flavors.
Finishing Touches
20 spring roll wrappers are the edible vessel that holds everything together. Look for the thin, translucent sheets in the freezer aisle; they fry up beautifully and develop that signature crisp. If you have dietary restrictions, there are gluten‑free options, but test one first to ensure it still fries to a golden hue.
Oil for frying is the medium that turns our raw ingredients into crunchy perfection. I recommend a high‑smoke‑point oil like vegetable or peanut oil; they can handle the 350°F (175°C) heat without burning, giving the rolls an even, golden color.
With your ingredients prepped and ready, let's get cooking. Here's where the fun really begins...
🍳 Step-by-Step Instructions
🔐 Expert Tips for Perfect Results
The Taste Test Trick
Before you start rolling, spoon a tiny bit of the cooked filling onto a piece of lettuce and taste it. This quick test lets you adjust seasoning while the mixture is still warm, ensuring that the final rolls hit the perfect balance of salty, sweet, and umami. I once served a batch that was a shade too salty, and a quick taste‑test would have saved me from an embarrassed dinner.
Why Resting Time Matters More Than You Think
Allow the cooked filling to rest for at least five minutes before assembling the rolls. This short pause lets the juices redistribute, preventing a soggy interior and giving each bite a cohesive texture. In my early attempts, I rolled the hot mixture straight away and ended up with a wet wrapper that fell apart during frying.
The Seasoning Secret Pros Won’t Tell You
Add a pinch of five‑spice powder or a dash of toasted sesame seeds to the filling for an extra layer of complexity. The subtle warmth of five‑spice pairs beautifully with beef, while sesame seeds add a gentle crunch that surprises the palate. I love sprinkling a little extra sesame oil right before the final fry – it creates a glossy finish that looks as good as it tastes.
Oil Temperature Mastery
Using a thermometer is the gold standard, but if you don’t have one, a wooden chopstick can be your guide. Drop the stick into the oil; if bubbles form rapidly around it, the oil is hot enough. Maintaining a steady 350°F ensures the wrapper crisps evenly without absorbing excess oil.
Rolling Like a Pro
Keep a damp kitchen towel nearby and lightly moisten the edge of each wrapper before sealing. The moisture acts like a glue, preventing the roll from unravelling during frying. I once forgot this step, and a few rolls opened up mid‑fry, turning my kitchen into a crunchy confetti party.
Serving with Style
Arrange the rolls on a platter lined with parchment and garnish with sliced scallions, cilantro, and lime wedges. The fresh herbs add a burst of color and a bright contrast to the deep‑fried rolls. When I serve them this way at family gatherings, the visual appeal often sparks conversation before anyone even takes a bite.
🌈 Delicious Variations to Try
One of my favorite things about this recipe is how versatile it is. Here are some twists I've tried and loved:
Spicy Sriracha Beef
Mix a tablespoon of sriracha into the filling for a gentle heat that tingles the tongue. The bright red hue adds visual excitement, and the heat pairs perfectly with a cooling cucumber‑yogurt dip.
Thai Basil Fusion
Stir in a handful of fresh Thai basil leaves at the end of cooking. The herb’s peppery, anise‑like flavor lifts the beef, making the rolls feel like a street‑food adventure in Bangkok.
Mushroom & Beef Medley
Add ½ cup of finely chopped shiitake or cremini mushrooms to the filling. The earthy mushrooms absorb the soy‑sesame sauce, adding depth and a meaty texture that complements the ground beef.
Crispy Coconut Crust
After rolling, lightly coat each roll in shredded coconut before frying. The coconut creates a fragrant, tropical crust that’s surprisingly crunchy and pairs beautifully with a mango‑chili dipping sauce.
Vegetarian “Beef” Alternative
Swap the ground beef for a plant‑based mince or crumbled tempeh, seasoned with the same soy‑sesame blend. The texture mimics meat, and the vegetables keep the roll hearty and satisfying for vegetarians.
Baked “Healthier” Version
Brush the assembled rolls with a thin layer of oil and bake at 400°F for 15‑20 minutes, turning halfway. You’ll still get a crisp exterior with far less oil, perfect for a lighter snack.
📦 Storage & Reheating Tips
Refrigerator Storage
Place cooled rolls in an airtight container lined with a paper towel to absorb excess moisture. They’ll stay crisp for up to 2 days, though the best texture is within the first 24 hours. If you notice any sogginess, re‑crisp them in a hot oven for a few minutes.
Freezing Instructions
Arrange the fully cooked rolls on a baking sheet in a single layer and freeze until solid. Transfer them to a zip‑top freezer bag, labeling with the date. They’ll keep for up to 3 months. When you’re ready to eat, skip the thawing and pop them straight into a hot oven or air fryer.
Reheating Methods
For a quick reheating, preheat your oven to 375°F and bake the rolls for 8‑10 minutes, turning halfway, until the wrapper regains its crunch. If you’re short on time, an air fryer set to 350°F for 4‑5 minutes does the trick. The secret to reheating without drying out? Add a splash of water to the bottom of the pan and cover loosely with foil – the steam keeps the interior moist while the top stays crispy.
❓ Frequently Asked Questions
Can I use pork instead of ground beef?
What if I don’t have a deep fryer?
Can I bake the rolls instead of frying?
How do I prevent the wrappers from tearing?
What dipping sauce works best?
Can I make these ahead of time?
Is there a gluten‑free wrapper option?
How do I keep the rolls from getting soggy after frying?
Similar Recipes
 Appetizers
Savor the Flavor: Herb Butter Turkey Sliders with Garlic Aioli Recipe
Delicious Savor the Flavor: Herb Butter Turkey Sliders with Garlic Aioli Recipe
 Appetizers
Crunchy Ranch Fiesta Pita Nachos: A Deliciously Fun Recipe
Delicious Crunchy Ranch Fiesta Pita Nachos: A Deliciously Fun Recipe
 Appetizers
Delicious Cinnamon Rolls with Oreos for Instant Joy
Learn how to make delicious Delicious Cinnamon Rolls with Oreos for Instant Joy. Easy recipe with…
 Appetizers
Irresistible Scotch Pie: The Best Cozy Comfort Food Recipe
Learn how to make delicious Irresistible Scotch Pie: The Best Cozy Comfort Food Recipe. Easy recipe…
 Appetizers
Garlic Herb Roasted Mushrooms: A Flavorful Side Dish for Every Occasion
Delicious Garlic Herb Roasted Mushrooms: A Flavorful Side Dish for Every Occasion
 Appetizers
Mini Ham and Cheese Croissants: A Decadent Delight for Any Occasion
Delicious Mini Ham and Cheese Croissants: A Decadent Delight for Any Occasion
 Appetizers
Charcuterie Nachos Supreme
Delicious Charcuterie Nachos Supreme
 Appetizers
winter citrus and spinach salad with oranges and lemons for healthy eating
Learn how to make delicious winter citrus and spinach salad with oranges and lemons for healthy…

Clara
I cook these recipes at home before they ever land here — simple ingredients, clear steps.
Other Reader Favorites
 Desserts
romantic dessert for two: 5 irresistible and sweet ideas
Learn how to make delicious romantic dessert for two: 5 irresistible and sweet ideas. Easy recipe…
 Dinner
Sweet and Spicy Pineapple Chicken
Delicious Sweet and Spicy Pineapple Chicken
 Appetizers
Crispy Air Fryer Buffalo Zucchini Bites: A Healthy Snack for Every Occasion
Delicious Crispy Air Fryer Buffalo Zucchini Bites: A Healthy Snack for Every Occasion
 Breakfast
Autumn Harvest Pumpkin & Walnut Spelt Bread: The Perfect Fall Recipe
Delicious Autumn Harvest Pumpkin & Walnut Spelt Bread: The Perfect Fall Recipe