Decadent Chocolate Peanut Butter Lava Cake Recipe
 Save
Save
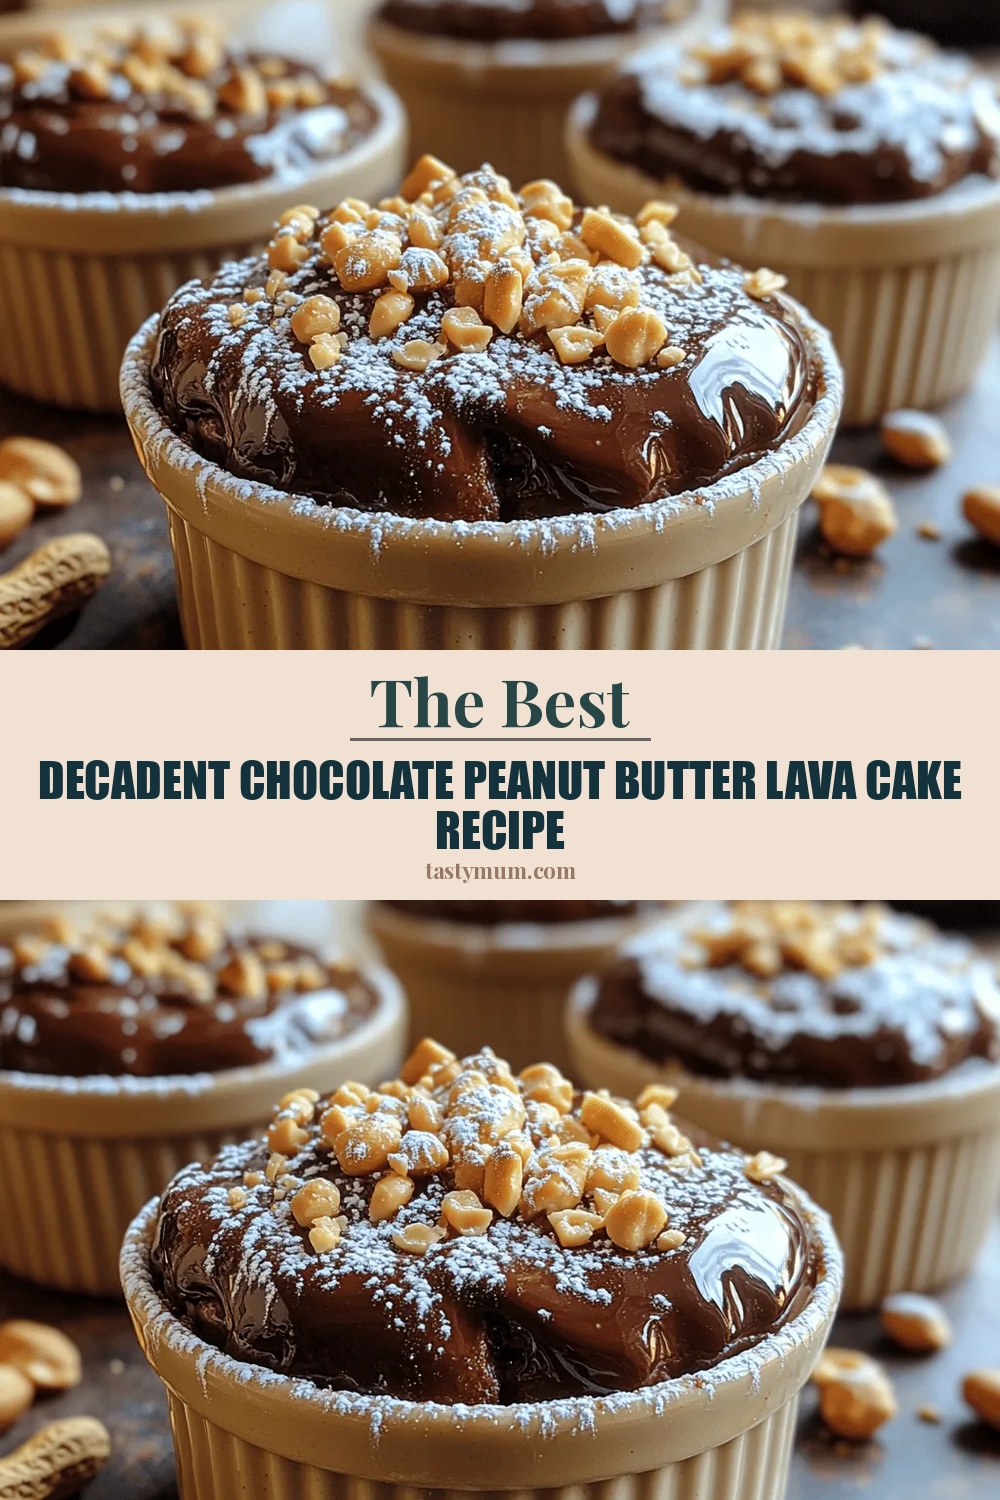
Imagine a warm, molten center that oozes silky chocolate and salty peanut butter the moment your fork pierces the golden crust. This Decadent Chocolate Peanut Butter Lava Cake delivers that drama in a single bite, turning any ordinary dessert into a show‑stopping finale.
What makes this cake truly unique is the contrast between the rich, fudgy chocolate exterior and the surprise molten core that blends smooth peanut butter with dark chocolate. The balance of sweet, salty, and slightly bitter notes keeps the palate excited from start to finish.
Chocolate lovers, peanut‑butter fans, and anyone craving a comforting indulgence will adore this dessert. It shines at dinner parties, holiday gatherings, or as a special treat after a long week.
The process is straightforward: melt chocolate and butter, whisk in eggs and sugar, fold in dry ingredients, spoon a hidden peanut‑butter‑chocolate mixture into each ramekin, then bake just long enough for the outer cake to set while the center stays molten.
Why You'll Love This Recipe
Irresistible Contrast: The crisp chocolate shell gives way to a silky peanut‑butter lava, creating a textural surprise that feels luxurious and comforting at the same time.
Simple Ingredients: Only pantry staples—good quality chocolate, creamy peanut butter, butter, eggs, and a few dry basics—are needed, making it easy to pull together on short notice.
Quick Bake Time: Each cake bakes for just 12 minutes, giving you a hot, gooey dessert without spending hours in the kitchen.
Impressive Presentation: Individual ramekins provide a polished, restaurant‑style look that impresses guests without demanding advanced pastry skills.
Tips & Tricks
Perfecting the Recipe
Use high‑cocoa chocolate. A 70 % cocoa bar provides the right balance of bitterness and meltability, ensuring the outer cake sets while the center stays fluid.
Chill the batter briefly. A short chill firms the batter, making it easier to handle and helping the crust develop a clean edge.
Don’t overbake. Keep a close eye after 10 minutes; the cake should look set around the rim but still jiggle slightly in the center.
Flavor Enhancements
For a deeper flavor profile, stir a pinch of espresso powder into the batter, or add a splash of bourbon to the lava core. A light drizzle of salted caramel sauce right before serving adds a luxurious salty‑sweet contrast.
Common Mistakes to Avoid
Avoid using low‑fat butter or margarine; they won’t create the same glossy crust and may cause the cake to dry out. Also, never skip the butter‑cocoa dusting in the ramekins—without it the cakes can stick and lose their dramatic reveal.
Pro Tips
Room‑temperature eggs. Warm eggs blend more easily with the melted chocolate, preventing lumps and ensuring a smooth batter.
Use a kitchen torch. After inverting, lightly torch the top for a caramelized finish that adds visual drama and a subtle smoky note.
Prep ramekins ahead. Grease and dust them the night before; this saves time and ensures an even coating for a flawless release.
Variations
Ingredient Swaps
Swap regular peanut butter for almond or cashew butter for a nutty twist. Use white chocolate in the lava core for a sweeter, milder center, or incorporate a teaspoon of chili powder for a subtle heat that pairs beautifully with chocolate.
Dietary Adjustments
For gluten‑free diners, replace the flour with a 1‑to‑1 gluten‑free blend. Vegan versions are possible by using coconut oil instead of butter, aquafaba in place of eggs, and a dairy‑free chocolate. Keto lovers can swap sugar for erythritol and use almond flour for the dry component.
Serving Suggestions
Pair each cake with a scoop of vanilla bean ice cream or a dollop of whipped coconut cream. A drizzle of raspberry coulis adds a bright acidity that cuts through the richness, while toasted coconut flakes give a pleasant crunch.
Storage Info
Leftover Storage
Allow any leftovers to cool completely, then cover each ramekin tightly with plastic wrap and store in an airtight container. Refrigerate for up to 3 days. For longer keeping, freeze the cakes (uncovered) for up to 2 months, then re‑wrap before returning to the freezer.
Reheating Instructions
To reheat, preheat the oven to 350°F (175°C), uncover the ramekin, and bake for 8‑10 minutes until the exterior is warm and the center begins to melt again. A quick microwave burst (20‑30 seconds) works in a pinch, but the oven preserves the coveted molten texture best.
Frequently Asked Questions
Can I make the lava cakes ahead of time?
What if my lava center solidifies after chilling?
How do I know when the cake is done without overcooking the center?
Can I substitute the ramekins with a different bakeware?
This Decadent Chocolate Peanut Butter Lava Cake brings together rich chocolate, creamy peanut butter, and a perfectly timed bake to create a show‑stopping dessert that feels luxurious yet approachable. By following the detailed steps, using quality ingredients, and applying a few pro tips, you’ll achieve that coveted molten center every time. Feel free to experiment with swaps or garnish ideas—making it your own is part of the fun. Serve warm, dive in, and enjoy the indulgent bliss!
Decadent Chocolate Peanut Butter Lava Cake Recipe
Delicious Decadent Chocolate Peanut Butter Lava Cake Recipe
Ingredients
Cake Batter
- 6 ounces (170 g) high‑quality dark chocolate, chopped
- 4 tablespoons (60 g) unsalted butter
- 1/2 cup (100 g) granulated sugar
- 3 large eggs, room temperature
- 3 tablespoons (24 g) all‑purpose flour
- 2 tablespoons (12 g) unsweetened cocoa powder
- 1/4 teaspoon fine sea salt
Peanut‑Butter Chocolate Lava Core
- 2 ounces (55 g) dark chocolate, finely chopped
- 2 tablespoons (30 g) creamy peanut butter
- 1 tablespoon (15 ml) heavy cream
- Pinch of sea salt
Garnish (optional)
- Powdered sugar for dusting
- Fresh berries (strawberries, raspberries)
- Extra dollop of peanut butter for drizzling
Instructions
Make the Chocolate Cake Batter
- Melting the chocolate. Place 6 ounces dark chocolate and 4 tablespoons butter in a heat‑proof bowl over a pot of simmering water (double boiler). Stir constantly until fully melted and smooth, about 3‑4 minutes. This gentle heat prevents scorching and creates a glossy base.
- Whisking eggs and sugar. In a separate mixing bowl, whisk 3 large eggs with 1/2 cup sugar until the mixture becomes pale and thick, roughly 2 minutes. Incorporating air here gives the cake its tender crumb.
- Combining wet ingredients. Pour the melted chocolate‑butter mixture into the egg‑sugar blend. Using a rubber spatula, fold gently until just combined—over‑mixing would develop gluten and make the cake dense.
- Incorporating dry ingredients. Sift together 3 tablespoons flour, 2 tablespoons cocoa powder, and 1/4 teaspoon sea salt. Fold the dry blend into the wet batter in two additions, stopping when no streaks remain.
- Chilling the batter. Cover the batter and refrigerate for 15 minutes. This firming step makes it easier to spoon into ramekins and helps the outer crust set quickly during baking.
Assemble & Bake
- Greasing the ramekins. Generously butter four 6‑ounce ramekins and dust with a thin layer of cocoa powder. This prevents sticking and adds a subtle chocolate flavor to the crust.
- Layering the batter. Spoon about 1 tablespoon of batter into each ramekin, spreading to coat the bottom and sides. This creates a “shell” that will hold the lava.
- Adding the lava core. Drop a heaping teaspoon of the chilled peanut‑butter chocolate mixture into the center of each ramekin. Top with another tablespoon of batter, smoothing the surface.
- Baking. Preheat the oven to 425°F (220°C). Place the ramekins on a baking sheet and bake for 12‑14 minutes. The edges should be set and slightly cracked while the center remains soft to the touch.
- Serving. Remove from the oven and let stand 1 minute. Run a thin knife around the edge, invert onto a plate, and dust with powdered sugar. Add fresh berries and a drizzle of extra peanut butter if desired. Serve immediately for maximum molten effect.
Similar Recipes
 Desserts
Sweet & Gooey S’mores Crescent Rolls Recipe
Delicious Sweet & Gooey S’mores Crescent Rolls Recipe
 Desserts
Southern Comfort in a Pie
Delicious Southern Comfort in a Pie
 Desserts
Heavenly Mini Chocolate Cream Pies: A Decadent Delight
Delicious Heavenly Mini Chocolate Cream Pies: A Decadent Delight
 Desserts
Chocolate-Dipped Ice Cream Tacos: A Sweet Delight!
Learn how to make delicious Chocolate-Dipped Ice Cream Tacos: A Sweet Delight!. Easy recipe with step-by-step…
 Desserts
Warm Chocolate Lava Cakes With Whipped Cream
Learn how to make delicious Warm Chocolate Lava Cakes With Whipped Cream. Easy recipe with step-by-step…
 Desserts
Decadent Dark Chocolate Sea Salt Caramel Cookies: A Heavenly Delight
Delicious Decadent Dark Chocolate Sea Salt Caramel Cookies: A Heavenly Delight
 Desserts
Cottage Cheese Protein Mousse
A light, high‑protein mousse that feels indulgent yet stays nutritious.
 Desserts
Pineapple Coconut Cheesecake Minis: Tropical Treat
Learn how to make delicious Pineapple Coconut Cheesecake Minis: Tropical Treat. Easy recipe with step-by-step instructions.

Clara
I cook these recipes at home before they ever land here — simple ingredients, clear steps.