As the leaves begin to change and a crispness fills the air, the arrival of fall evokes a sense of warmth and comfort. One of the most beloved flavors of this season is pumpkin spice, a harmonious blend of cinnamon, nutmeg, and ginger that brings to mind cozy evenings by the fireplace and the delightful aroma of baked goods wafting through the home. Pumpkin spice has become synonymous with autumn, making its way into everything from lattes to desserts. This year, why not bring that festive flavor to your breakfast table with a fun twist on a classic dish?
Introducing Pumpkin Spice Pancake Sticks—delicious, portable, and perfect for sharing with family and friends. These pancake sticks retain the beloved flavor profile of traditional pumpkin pancakes but are transformed into a delightful finger food that’s easy to eat. Whether served at a weekend brunch or as a quick weekday breakfast, these pancake sticks are sure to satisfy your cravings for fall flavors while also adding a touch of fun to your morning routine.
Understanding the Ingredients
To fully appreciate the beauty of Pumpkin Spice Pancake Sticks, it’s important to understand the role each ingredient plays in the recipe. Each component contributes not only to the flavor but also to the texture and overall enjoyment of the dish.
– All-Purpose Flour: This is the backbone of the pancake sticks, providing the necessary structure and texture. All-purpose flour is versatile and creates a tender, fluffy pancake when combined with the right ingredients.
– Pumpkin Puree: The star of the show, pumpkin puree adds moisture and a rich, earthy flavor that sets these pancake sticks apart. It’s also packed with nutrients, making your breakfast a bit healthier.
– Sugar: Balancing the spices, sugar adds sweetness to the pancake sticks. It helps to enhance the flavors of the pumpkin and spices, ensuring a delectable bite every time.
– Baking Powder and Baking Soda: These leavening agents are crucial for achieving fluffy pancake sticks. They create air pockets in the batter, allowing the pancakes to rise and become light and airy.
– Spices (Cinnamon, Nutmeg, Ginger): The essence of pumpkin spice lies in these warm spices. Cinnamon adds warmth, nutmeg introduces a hint of sweetness, and ginger brings a subtle zing, creating a comforting flavor profile that defines this seasonal treat.
– Salt: While it may seem minor, salt plays an essential role by enhancing the overall flavor of the pancake sticks, balancing the sweetness and bringing out the depth of the spices.
– Buttermilk: This ingredient adds moisture and a tender crumb to the pancake sticks. The acidity in buttermilk also reacts with the baking soda, contributing to the pancakes’ fluffiness.
– Egg: The egg acts as a binder, holding the ingredients together while also adding richness to the batter. It helps create a cohesive mixture that results in delicious pancake sticks.
– Butter: Providing flavor and moisture, melted butter enriches the batter, ensuring that the pancake sticks are not only tasty but also have a lovely, satisfying texture.
Preparation Steps for Pumpkin Spice Pancake Sticks
Now that you have a better understanding of the ingredients, let’s delve into the preparation process for making these delightful Pumpkin Spice Pancake Sticks. The steps are straightforward, making this recipe accessible for cooks of all skill levels.
Step 1: Gather Your Ingredients
Before you start cooking, ensure you have all the necessary ingredients at hand. This will not only streamline the cooking process but also make it easier to follow the recipe. You’ll need:
– 1 cup all-purpose flour
– 1 cup pumpkin puree
– 1/4 cup sugar
– 1 teaspoon baking powder
– 1/2 teaspoon baking soda
– 1 teaspoon cinnamon
– 1/2 teaspoon nutmeg
– 1/2 teaspoon ginger
– 1/4 teaspoon salt
– 1 cup buttermilk
– 1 large egg
– 2 tablespoons melted butter
Step 2: Prepare the Batter
In a large mixing bowl, combine the dry ingredients: all-purpose flour, sugar, baking powder, baking soda, cinnamon, nutmeg, ginger, and salt. Whisk these together until they are well combined. This step is crucial, as it ensures that the leavening agents and spices are evenly distributed throughout the flour, leading to consistent flavor and texture in your pancake sticks.
In a separate bowl, mix the wet ingredients: pumpkin puree, buttermilk, egg, and melted butter. Stir these together until the mixture is smooth and well incorporated. This is where the rich pumpkin flavor begins to shine, and you can already get a sense of how delightful your pancake sticks will taste.
Step 3: Combine Wet and Dry Ingredients
Once both mixtures are ready, it’s time to combine them. Pour the wet ingredients into the bowl with the dry ingredients. Using a spatula or wooden spoon, gently fold the mixtures together. Be careful not to overmix; a few lumps are perfectly fine. Overmixing can lead to dense pancake sticks instead of the light and fluffy texture you desire.
Step 4: Preheat Your Cooking Surface
While your batter rests for a few minutes, preheat your skillet or griddle over medium heat. If you’re using a non-stick surface, there’s no need to add additional oil or butter, but a light coating may be helpful for better browning.
Step 5: Cook the Pancake Sticks
Once your skillet is heated, it’s time to cook the pancake sticks. Using a ladle or measuring cup, pour a small amount of batter onto the skillet, forming strips or shapes that resemble sticks. Depending on your skillet’s size, you can cook multiple sticks at once, but be sure to leave enough space between them.
Cook the pancake sticks for about 2-3 minutes on one side, or until bubbles start to form on the surface and the edges look set. Carefully flip them over and cook for another 1-2 minutes until they are golden brown and cooked through.
This cooking method ensures that each stick is perfectly fluffy and infused with that iconic pumpkin spice flavor.
Step 6: Serve and Enjoy
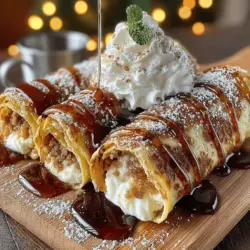
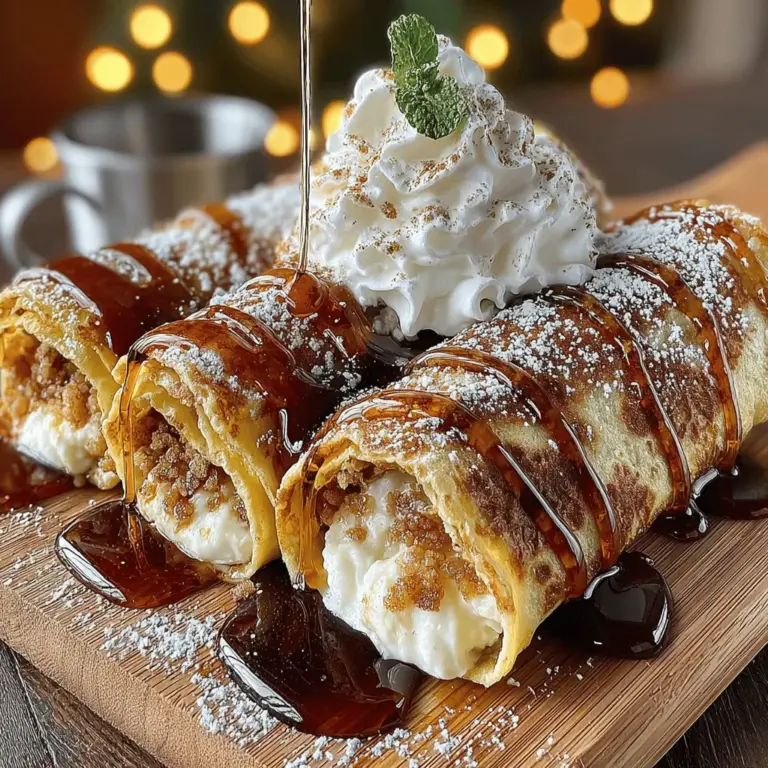
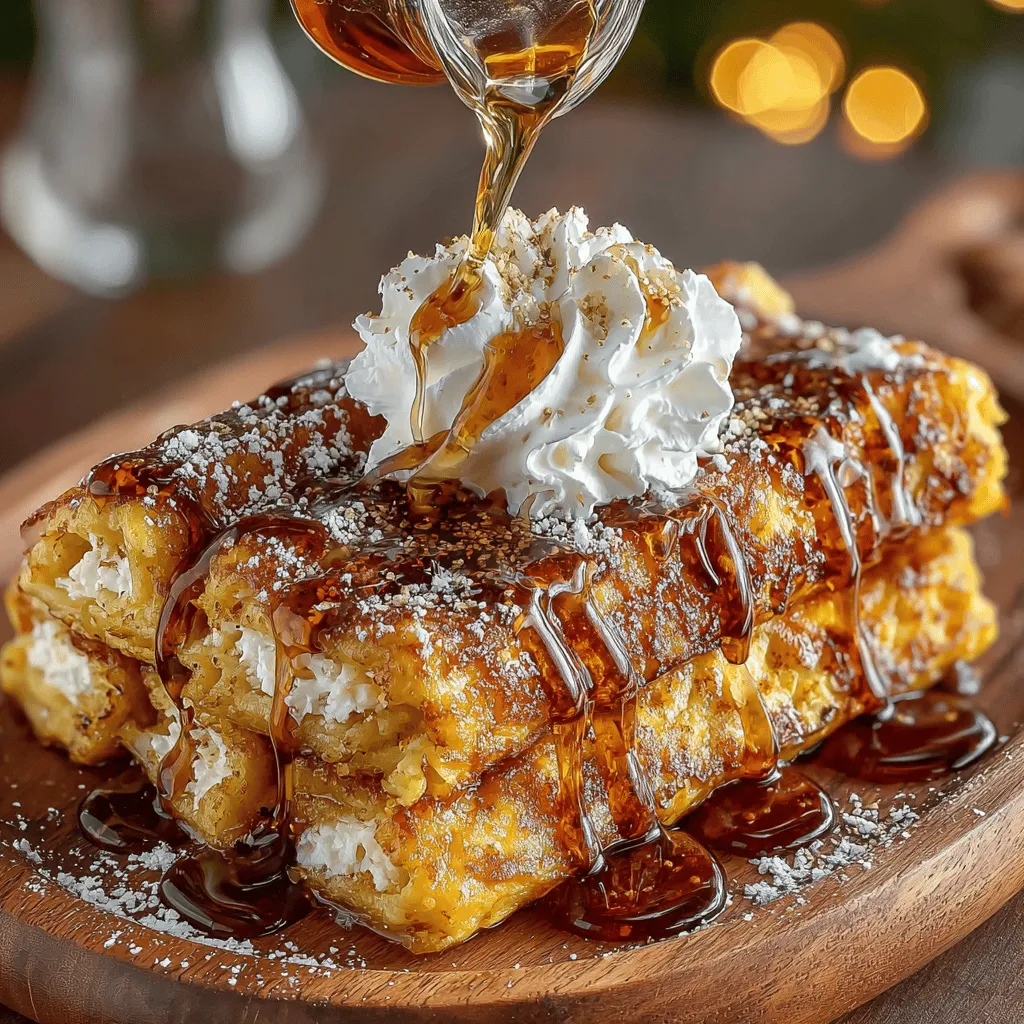
Once they are cooked to perfection, transfer the pancake sticks to a plate and keep them warm while you finish cooking the rest of the batter. Serve the sticks warm with your favorite toppings—think maple syrup, whipped cream, or even a sprinkle of powdered sugar for an extra touch of sweetness.
Pumpkin Spice Pancake Sticks not only make for a delicious breakfast but also add a festive flair to your morning routine.
By following these initial steps, you’re well on your way to creating a delightful dish that captures the essence of fall. Stay tuned for the next part of this article, where we will explore creative serving ideas and variations to elevate your pancake stick experience even further.
Mixing Dry Ingredients
To start, it’s essential to focus on the dry ingredients for your pumpkin spice pancake sticks. Whisking is a crucial step that ensures even distribution of all the dry elements, preventing clumps and leading to a consistent texture throughout your batter. Combine the flour, baking powder, baking soda, pumpkin spice mix, and a pinch of salt in a large mixing bowl. Using a whisk, stir these ingredients together thoroughly for about 30 seconds. This not only aerates the flour but also ensures that the leavening agents are evenly mixed, which is vital for achieving fluffy, light pancake sticks.
Combining Wet Ingredients
Next, turn your attention to the wet ingredients. In a separate bowl, combine the pumpkin puree, milk, eggs, and melted butter. Whisk these together until smooth. The goal is to achieve a creamy texture that binds the dry ingredients effectively. When you pour the wet mixture into the dry ingredients, you want it to be well-combined but not overly blended. This is where you can incorporate a splash of vanilla extract to enhance the flavor profile, adding depth to your pancake sticks. The mixture should have a slightly thick, pourable consistency, resembling a smooth batter that will hold its shape when cooked.
Merging Mixtures
Now that you have prepared both mixtures, it’s time to bring them together. Pour the wet ingredients into the dry mixture and gently fold them using a spatula or wooden spoon. The key here is to avoid overmixing. Overmixing can cause the gluten in the flour to develop too much, resulting in tough pancake sticks instead of the desired fluffy texture. Aim for a batter that still has some lumps; it’s perfectly okay. The lumps indicate that the batter is still tender, which will yield soft and airy pancake sticks.
Preparing the Pan
Before you start cooking, prepare your pan correctly. Preheat a non-stick skillet or griddle over medium heat. A hot pan is essential for achieving that perfect golden-brown finish. To check if the pan is ready, you can sprinkle a few drops of water onto the surface; if they dance and evaporate quickly, your pan is good to go. Lightly grease the pan with a small amount of butter or oil, ensuring an even coating. This will help prevent sticking and contribute to the crispy edges that everyone loves in pancake sticks.
Cooking the Pancake Sticks
Pouring and Shaping the Batter
When it comes to cooking, pour the batter into the pan in a rectangular shape, aiming for about 3 inches wide and 6 inches long. This will help create the stick shape you’re looking for. If you prefer a thicker pancake stick, use a little more batter, but remember that thicker sticks may take longer to cook through. Keep the shape consistent for even cooking and easier slicing later.
Cooking Tips
Cook the pancake sticks for approximately 2-3 minutes on one side. You’ll know it’s time to flip them when you see small bubbles forming on the surface and the edges starting to look set. Use a spatula to gently lift the edges before flipping to ensure they are not sticking. Once flipped, allow them to cook for another 2-3 minutes until they are golden brown and cooked through. A quick tip: if they are browning too quickly, lower the heat slightly to prevent burning.
Managing the Cooking Process
Continue cooking the pancake sticks in batches, maintaining a consistent temperature throughout the cooking process. If you notice that the butter in the pan is browning too quickly, wipe out the old butter and add a fresh pat to keep the surface non-stick. This will ensure each batch cooks evenly and retains that delightful buttery flavor.
Slicing and Serving
Slicing Technique
Once all pancake sticks are cooked, it’s time to slice them for serving. Using a sharp knife or a pizza cutter, cut the pancake sticks into strips about 1-2 inches wide. This size is perfect for dipping and makes it easy for everyone to enjoy. For a beautiful presentation, arrange the sticks on a platter, stacking them slightly for visual appeal.
Serving Suggestions
These pancake sticks can be served warm, drizzled with maple syrup, or topped with a dollop of whipped cream for an indulgent treat. For an extra fall touch, consider sprinkling some chopped pecans or walnuts on top, or even a dusting of powdered sugar. Fresh fruit, such as sliced bananas or apples, can also enhance the dish, adding freshness and contrasting flavors to the warm, spiced pancake sticks.
Nutritional Information
These pumpkin spice pancake sticks are not only delicious but also nutritious. Each serving is packed with the goodness of pumpkin, which is high in vitamins A and C, as well as fiber, making it a great addition to a balanced breakfast. The use of whole-grain flour can further boost the nutritional profile, providing essential nutrients while keeping you satiated throughout the morning. A typical serving of two pancake sticks contains approximately 200 calories, with 5 grams of protein and 3 grams of fiber. This makes them a wholesome choice for health-conscious eaters looking to enjoy a seasonal treat without compromising on nutrition.
Conclusion
Making pumpkin spice pancake sticks is more than just preparing a meal; it’s an experience that brings warmth and joy to your kitchen, especially in the fall. The delightful aroma of pumpkin and spices wafting through your home is sure to create cherished memories with family and friends. This recipe not only provides a delicious breakfast option but also a way to celebrate the flavors of the season. Encourage your loved ones to join you in the kitchen, savoring the process of creating these delicious treats together. Enjoy each bite and the moments spent around the table, making this recipe a cherished tradition for years to come.