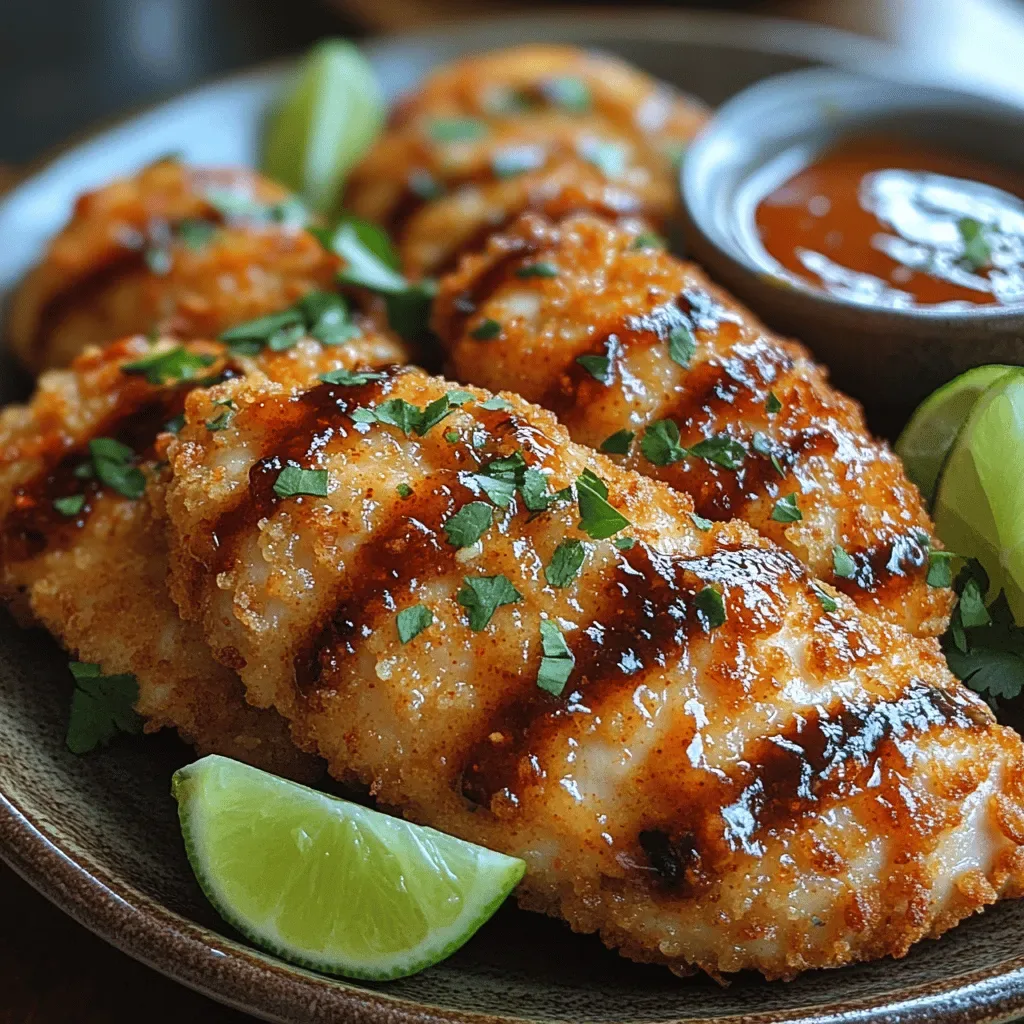
Sweet Chili Chicken Tenders: A Flavorful Delight

WANT TO SAVE THIS RECIPE?

Introduction

Sweet Chili Chicken Tenders have swiftly become a beloved dish in many households, earning their place as a go-to option for both casual gatherings and special occasions. Their combination of crispy texture and a tantalizing sweet-and-spicy flavor profile makes them irresistible to both adults and children alike. Whether you are hosting a family dinner, planning for game day snacks, or simply seeking a delightful weeknight meal, these chicken tenders are sure to impress your taste buds.

The beauty of Sweet Chili Chicken Tenders lies not only in their fantastic taste but also in their versatility. They can be served as an appetizer, a main course, or even as a fun addition to a buffet spread. The dish is adaptable enough to suit various culinary preferences, whether you enjoy them on their own, paired with a dipping sauce, or as part of a larger meal. In this article, we aim to provide you with a comprehensive, step-by-step guide to creating these delicious chicken tenders in the comfort of your own kitchen. Get ready to learn how to whip up a batch that will have everyone reaching for more!

Understanding Sweet Chili Chicken Tenders

At their core, Sweet Chili Chicken Tenders are strips of chicken breast that are coated in a flavorful batter, fried or baked until golden brown, and then tossed in a luscious sweet chili sauce. The result is a dish that showcases the perfect balance of heat and sweetness, leaving diners craving the next bite.

The origins of sweet chili sauce can be traced back to Southeast Asia, where it is commonly used in various dishes. This sauce typically combines red chili peppers, sugar, vinegar, and garlic, resulting in a condiment that delivers a unique blend of flavors. The sweetness comes from the sugar, while the chili peppers provide a gentle heat, making it a favorite among those who enjoy a bit of spice but prefer not to be overwhelmed by it.

When it comes to cooking methods, you have a choice between frying and baking your chicken tenders. Frying yields a crispy exterior and a juicy interior, while baking provides a healthier alternative that can still deliver a satisfying crunch when prepared correctly. No matter which method you choose, the key to achieving tender and flavorful chicken is to ensure it is cooked to perfection.

From a nutritional standpoint, chicken tenders can be a great source of lean protein, which is vital for muscle growth and repair. Incorporating chicken into your diet can also provide essential nutrients such as B vitamins, phosphorus, and selenium, all of which play important roles in maintaining overall health.

Ingredients Breakdown

To create Sweet Chili Chicken Tenders, you will need a variety of ingredients that come together to build rich flavors and textures. Below is a detailed breakdown of each ingredient and tips for sourcing the best options.

1. Chicken Tenders: The star of the dish, chicken tenders are boneless strips cut from the breast of the chicken. For the best results, look for high-quality chicken tenders from a reputable source. You can also use chicken breasts cut into strips if tenders are not available.

2. All-Purpose Flour: This is used for dredging the chicken, helping to create a crispy outer layer. For those with gluten sensitivities, gluten-free flour blends or cornstarch can serve as excellent alternatives.

3. Seasonings: Flavor is enhanced with garlic powder and paprika. Garlic powder adds a subtle savory note, while paprika contributes a mild smokiness and vibrant color to the dish. Feel free to adjust the quantities to suit your taste preferences.

4. Panko Breadcrumbs: These Japanese-style breadcrumbs are larger and airier than traditional breadcrumbs, resulting in a superior crunch. They are essential for achieving that perfect crispy texture. If you prefer a gluten-free option, look for gluten-free panko or make your own from gluten-free bread.

5. Sweet Chili Sauce: The sauce brings everything together, providing that signature sweetness and heat. You can either purchase a bottle from the store or whip up a homemade version using simple ingredients like sugar, vinegar, and chili flakes.

6. Garnishes: Fresh cilantro and lime juice are often used as garnishes for this dish. They not only enhance the visual appeal but also add a fresh, zesty flavor that balances the richness of the chicken tenders.

Step-by-Step Instructions

Preparing the Chicken

The first step in making your Sweet Chili Chicken Tenders is preparing the chicken. Start by ensuring your chicken tenders are thawed and patted dry with paper towels. This step is crucial as it helps the coating adhere better and prevents excess moisture from interfering with the crispiness of the final product.

Once your chicken tenders are ready, set up a dredging station with three shallow bowls. In the first bowl, combine the all-purpose flour with garlic powder and paprika, mixing well to ensure even seasoning. In the second bowl, beat a couple of eggs, which will help the breadcrumbs stick to the chicken. In the third bowl, pour in the panko breadcrumbs, giving you a nice crunchy coating.

To coat the chicken tenders, take one piece and dip it in the flour mixture, making sure to coat both sides evenly. Shake off any excess flour before moving it to the egg mixture, ensuring it is well coated. Finally, transfer the chicken to the bowl of panko breadcrumbs, pressing gently to adhere the crumbs to the chicken. Repeat this process for all the chicken tenders, placing them on a plate or baking sheet when finished.

Next, you can choose to fry or bake your chicken tenders, depending on your preferred cooking method. If frying, prepare a deep skillet or frying pan with oil heated to around 350°F (175°C). Carefully place the coated chicken tenders in the hot oil, cooking in batches if necessary to avoid overcrowding. Fry until golden brown and cooked through, which should take about 4-6 minutes per side. For the baking method, preheat your oven to 425°F (220°C), line a baking sheet with parchment paper, and arrange the chicken tenders in a single layer. Bake for about 15-20 minutes, flipping halfway through, until they are golden and crispy.

Once your chicken tenders are cooked, it’s time to toss them in the sweet chili sauce for that final touch of flavor. You can either dip each tender directly into the sauce or place them in a bowl, pouring the sauce over and tossing to coat evenly.

With the preparation underway, you are well on your way to enjoying these delectable Sweet Chili Chicken Tenders. Stay tuned for the next section, where we will delve deeper into the cooking techniques and additional tips to elevate your dish even further.

Before embarking on the journey to create your Sweet Chili Chicken Tenders, it’s essential to start with clean chicken. Rinsing the chicken tenders under cold water removes any residual blood or impurities, ensuring a fresher flavor. However, rinsing is just the first step. After rinsing, pat the chicken tenders dry with paper towels. This step is crucial because excess moisture can hinder the dredging process and lead to soggy tenders. Dry chicken helps the flour adhere better and ultimately results in a crispier crust after frying.

Importance of Rinsing and Drying Chicken Tenders

Before embarking on the journey to create your Sweet Chili Chicken Tenders, it’s essential to start with clean chicken. Rinsing the chicken tenders under cold water removes any residual blood or impurities, ensuring a fresher flavor. However, rinsing is just the first step. After rinsing, pat the chicken tenders dry with paper towels. This step is crucial because excess moisture can hinder the dredging process and lead to soggy tenders. Dry chicken helps the flour adhere better and ultimately results in a crispier crust after frying.

Ensuring Even Cooking by Cutting Chicken to Uniform Sizes

Uniformity in size is vital for even cooking. Chicken tenders typically vary in thickness, which can lead to some pieces cooking faster than others. To avoid this, you should trim any excessively thick parts of the tenders while ensuring all pieces are roughly the same size—about 1 inch thick is ideal. This consistency ensures that every piece cooks evenly, providing a delightful texture and flavor throughout.

Setting Up a Dredging Station

Creating a dredging station simplifies the coating process and enhances efficiency while cooking. Your station should consist of three separate shallow dishes: one for flour, one for beaten eggs, and one for breadcrumbs. Here’s how to set it up:

1. Flour Station: In the first dish, add all-purpose flour and season it with salt and pepper. You can also add garlic powder, paprika, or any seasoning of your choice for added flavor.

2. Egg Wash: In the second dish, crack a few eggs and whisk them until they’re well combined. This egg wash will help the breadcrumbs stick to the chicken.

3. Breadcrumb Coating: In the third dish, place your breadcrumbs. Panko breadcrumbs are an excellent choice for a crunchier texture, but regular breadcrumbs will work as well.

Explanation of the Dredging Process: Flour, Egg, and Breadcrumb Coating

The dredging process is straightforward yet effective in creating that perfect coating. Here’s a step-by-step guide:

1. Coat in Flour: Take a chicken tender and dredge it in the flour mixture, ensuring it’s fully covered. Shake off any excess flour.

2. Dip in Egg: Next, immerse the floured chicken tender in the egg wash, allowing any excess to drip off.

3. Cover with Breadcrumbs: Finally, coat the chicken in the breadcrumb mixture, pressing gently to ensure the crumbs adhere well. Repeat this process for all chicken tenders, placing them on a plate once coated.

Tips for Successful Coating: Avoiding Clumping and Ensuring Adherence

To achieve the best results, consider these tips:

Work in Batches: Don’t overcrowd the dredging station. Work with a few pieces at a time to ensure each tender gets adequate coating.

Dry Hands: Wet hands can make the dredging process messy and lead to clumping. Keep your hands dry or use one hand for wet (egg) and the other for dry (flour and breadcrumbs) to maintain cleanliness.

Press the Coating: When applying breadcrumbs, gently press them onto the chicken to ensure they stick. This technique prevents the coating from falling off during frying.

Frying the Tenders

Frying is where the magic happens, transforming your coated chicken into golden, crispy tenders. Here’s how to do it right:

Importance of Oil Temperature and How It Affects Cooking

Oil temperature is crucial for achieving crispy chicken tenders. Ideally, you want the oil to be between 350°F to 375°F. If the oil is too cool, the chicken will absorb too much oil and turn greasy. If it’s too hot, the coating may burn before the chicken cooks through.

To check the temperature, use a kitchen thermometer or drop a small piece of bread into the oil—if it bubbles and browns in about 60 seconds, the oil is ready.

Techniques for Ensuring Even Frying and Crispiness

1. Fry in Batches: Avoid overcrowding the pan, as this can lower the oil temperature. Fry a few tenders at a time, allowing ample space for even cooking.

2. Flip Carefully: Use tongs to flip the tenders halfway through cooking. This action ensures both sides achieve that beautiful golden brown color.

3. Drain Excess Oil: Once cooked (about 4-5 minutes per side), transfer the tenders to a plate lined with paper towels. This step absorbs excess oil, keeping your tenders crispy.

Safety Tips for Frying: Avoiding Splatter and Proper Pan Management

Frying can be a bit messy, so keep safety in mind. Here are a few tips to minimize splatters:

Use a Deep Pot: A deep skillet or pot helps contain oil splatter. A splatter guard can also be beneficial.

Control the Heat: Maintain a steady heat. Rapid temperature changes can cause oil to splatter.

Be Cautious: Always add chicken to the oil gently to prevent splashing. A long-handled slotted spoon can help lower the tenders into the oil safely.

Glazing the Tenders

Once your chicken tenders are fried to perfection, it’s time to glaze them with the sweet chili sauce that brings this dish to life.

How to Achieve the Perfect Glaze with Sweet Chili Sauce

1. Warm the Sauce: In a small saucepan over low heat, warm your sweet chili sauce. This step enhances its flavor and helps it adhere better to the tenders.

2. Coat the Tenders: Dip each fried tender into the warm sauce, ensuring it’s coated evenly. For a lighter glaze, you can brush the sauce over the tenders instead of dunking them.

Tips for Evenly Coating Without Losing Crispiness

Glaze Just Before Serving: For the crispiest tenders, glaze them just before serving. This approach allows the crust to remain crunchy while delivering that sweet and spicy flavor.

Serve on the Side: Alternatively, serve the sweet chili sauce on the side as a dipping sauce. This method keeps the tenders crispy until you’re ready to enjoy them.

Serving Suggestions

Presentation can elevate your dining experience. Here are some creative plating ideas and suggested side dishes to complement your sweet chili chicken tenders:

Creative Plating Ideas

Garnish with Herbs: Fresh herbs like cilantro or green onions can add a pop of color and flavor to your presentation. Sprinkle them over the tenders right before serving.

Serve on a Wooden Board: Placing your tenders on a rustic wooden board creates a casual and appealing look. Pair with small bowls of dipping sauces for a fun, interactive dining experience.

Suggested Side Dishes That Pair Well with Sweet Chili Chicken Tenders

1. Crispy Fries or Sweet Potato Fries: The classic side of fries complements the sweetness of the tenders while adding a satisfying crunch.

2. Coleslaw: A refreshing coleslaw with tangy dressing balances the sweetness of the chicken tenders and adds a crunchy texture.

3. Rice or Quinoa: A simple side of jasmine rice or quinoa provides a neutral base that allows the flavors of the tenders to shine.

4. Steamed Vegetables: Lightly steamed broccoli or mixed vegetables add color and nutrition, rounding out the meal beautifully.

Variations and Adaptations

To keep things exciting, consider these variations and adaptations:

Spicy Version: Adding Sriracha or Cayenne to the Sweet Chili Sauce

If you enjoy a bit of heat, elevate your sweet chili sauce by mixing in sriracha or a pinch of cayenne pepper. This addition will provide a delightful balance of sweet and spicy, making your tenders even more irresistible.

Baked Alternative: Instructions for Baking Instead of Frying

For a healthier twist, you can bake the chicken tenders instead of frying them. Here’s how:

1. Preheat your oven to 400°F.

2. Place the coated tenders on a baking sheet lined with parchment paper.

3. Spray the tenders lightly with cooking spray or brush with olive oil to promote browning.

4. Bake for 20-25 minutes, flipping halfway through, until golden brown and cooked through.

Vegetarian Option: Using Tofu or Tempeh with Panko Coating

For a vegetarian version, substitute chicken with firm tofu or tempeh. Cut them into strips, follow the same dredging process, and fry or bake as you would with chicken. The panko coating will provide a satisfying crunch, making it an excellent option for non-meat eaters.

Conclusion

Sweet Chili Chicken Tenders are not just a dish; they are an experience—crispy, flavorful, and versatile enough to adapt to various tastes and dietary preferences. Whether you enjoy them as a snack, an appetizer, or the star of your dinner table, these tenders are sure to become a family favorite.

We encourage you to try the recipe, experiment with the variations, and share the joy of cooking with your loved ones. There’s something special about gathering around the table and enjoying a meal that you’ve created with care. So roll up your sleeves, get cooking, and savor every delicious bite of your homemade Sweet Chili Chicken Tenders!

Before embarking on the journey to create your Sweet Chili Chicken Tenders, it’s essential to start with clean chicken. Rinsing the chicken tenders under cold water removes any residual blood or impurities, ensuring a fresher flavor. However, rinsing is just the first step. After rinsing, pat the chicken tenders dry with paper towels. This step is crucial because excess moisture can hinder the dredging process and lead to soggy tenders. Dry chicken helps the flour adhere better and ultimately results in a crispier crust after frying.

Sweet Chili Chicken Tenders

Discover the deliciousness of Sweet Chili Chicken Tenders, a perfect blend of crispy texture and sweet-and-spicy flavor that delights both kids and adults. Whether for a family dinner or game day snacks, this versatile dish is ideal as an appetizer or part of a buffet. Learn how to make this easy recipe with step-by-step instructions, tips for achieving the perfect glaze, and suggestions for tasty sides. Dive in and elevate your mealtime experience!

Ingredients
  

1 lb chicken tenders

1 cup all-purpose flour

1/2 teaspoon salt

1/2 teaspoon black pepper

1 teaspoon garlic powder

1 teaspoon paprika

2 large eggs

1 cup panko breadcrumbs

1 cup sweet chili sauce (plus extra for serving)

2 tablespoons vegetable oil (for frying)

Fresh cilantro, chopped (for garnish)

Lime wedges (for serving)

Instructions
 

Prepare Chicken: Rinse the chicken tenders under cold water and pat them dry with paper towels. Set aside.

    Set Up Dredging Station: In a shallow bowl, combine flour, salt, black pepper, garlic powder, and paprika. In a second bowl, beat the eggs. In a third bowl, place the panko breadcrumbs.

      Coat the Chicken:

        - Dredge each chicken tender in the seasoned flour, shaking off the excess.

          - Dip it into the beaten eggs, allowing excess to drip off.

            - Finally, coat with panko breadcrumbs, pressing gently to adhere. Place the coated chicken tenders on a baking sheet.

              Fry the Tenders: In a large skillet, heat 2 tablespoons of vegetable oil over medium heat. Once hot, add the chicken tenders in batches (don’t overcrowd the pan) and cook for about 4-5 minutes on each side, or until they turn golden brown and reach an internal temperature of 165°F. Transfer to a paper towel-lined plate to drain excess oil.

                Glaze the Tenders: In a large mixing bowl, add the cooked chicken tenders and pour the sweet chili sauce over them. Toss gently until they are evenly coated.

                  Serve: Plate the sweet chili chicken tenders garnished with chopped cilantro. Serve with lime wedges and extra sweet chili sauce on the side for dipping. Enjoy!

                    Prep Time, Total Time, Servings: 15 minutes | 30 minutes | 4 servings

                      WANT TO SAVE THIS RECIPE?

                      Leave a Comment

                      Recipe Rating