Introduction
Chocolate chip cookies are not just a treat; they are a nostalgic symbol of comfort and warmth for many. From childhood memories of baking with family to enjoying a fresh batch with a glass of milk, these cookies have a special place in our hearts. Their popularity spans generations and cultures, making them a timeless classic in the realm of desserts. Whether enjoyed at a party, as a late-night snack, or as a simple indulgence, chocolate chip cookies bring joy to countless people around the world.
However, the secret to achieving the perfect chocolate chip cookie lies not only in the recipe but also in the quality of ingredients used. This article aims to provide a comprehensive step-by-step guide to creating the ultimate chocolate chip cookies, ensuring that each bite is a delightful experience bursting with flavor and texture. By understanding the role of each ingredient, selecting the right tools, and following precise techniques, you can craft cookies that are chewy, gooey, and utterly irresistible.
Understanding the Essentials of Chocolate Chip Cookies
To make the best chocolate chip cookies, it’s crucial to understand the basic ingredients that contribute to their unique flavor and texture. Each component plays a vital role in the overall outcome, from the structure of the cookie to its sweetness and richness.
Classic Chocolate Chip Cookie Ingredients
1. Flour: The foundation of your cookie dough, flour provides structure and stability. All-purpose flour is the most commonly used flour for chocolate chip cookies, but specialty flours like whole wheat or almond flour can add unique flavors and textures. The protein content in flour affects the cookie’s chewiness, so choosing the right kind is essential.
2. Sugars: The combination of granulated and brown sugar is what gives chocolate chip cookies their distinct flavor and texture. Granulated sugar contributes to the crispness of the cookie edges, while brown sugar adds moisture and a rich, caramel-like flavor. The ratio of these sugars can significantly alter the final result, so it’s important to follow the recipe closely.
3. Butter: Butter is the star ingredient that brings richness and flavor to your cookies. The choice between unsalted and salted butter can impact the sweetness of the dough, with unsalted butter allowing for better control over the overall salt content. Additionally, the temperature of the butter matters; softened butter, at room temperature, creates a creamier texture when mixed with sugars.
4. Eggs: Acting as a binding agent, eggs play a crucial role in the texture of your cookies. They add moisture and richness, helping to create a tender cookie. The size of the eggs can also affect the dough consistency, so using large eggs (the standard in baking) is recommended.
5. Chocolate: The type of chocolate you choose can dramatically influence your cookie’s flavor profile. Semi-sweet chocolate chips are the classic choice, but you can also experiment with dark chocolate, milk chocolate, or even white chocolate for a twist. Each chocolate type brings different levels of sweetness and richness.
6. Optional Add-ins: To enhance your cookies further, consider adding ingredients like chopped nuts, sea salt, or other flavor enhancers. Walnuts or pecans can provide a satisfying crunch, while a sprinkle of flaky sea salt on top can elevate the flavor, balancing the sweetness.
Importance of Freshness and Quality in Baking
When it comes to baking, the freshness and quality of your ingredients can make all the difference. Stale flour or old chocolate chips can lead to disappointing results, so always check expiration dates and opt for high-quality products. Fresh ingredients not only enhance the flavor but also ensure the proper chemical reactions occur during baking, leading to the perfect texture and rise in your cookies.
Choosing the Right Ingredients for Your Chocolate Chip Cookies
Now that we understand the essential ingredients, it’s time to dive deeper into how to choose the right components for your chocolate chip cookies. This section will help you select the best options to ensure your cookies turn out perfectly.
Flour: All-Purpose vs. Specialty Flours
All-purpose flour is the go-to choice for most chocolate chip cookie recipes due to its balanced protein content, which provides the right structure without making the cookies too dense. However, you can experiment with specialty flours to create unique flavors. For example, swapping a portion of all-purpose flour with whole wheat flour will give your cookies a nutty taste and added nutritional value. Be mindful that using specialty flours may require adjustments to the liquid content in your recipe.
Sugars: Granulated, Brown, and Their Importance
Both granulated and brown sugars are essential for achieving the perfect texture in chocolate chip cookies. Granulated sugar creates a crisp edge, while brown sugar adds moisture and chewiness. For a unique flavor, consider using turbinado sugar for a slight crunch on the outside. When measuring sugars, pack brown sugar into the measuring cup for accurate results, as this ensures you are using the correct amount for moisture balance.
Butter: Unsalted vs. Salted and the Science Behind Butter Temperature
Most bakers prefer unsalted butter in their cookie recipes to control the salt levels better. When it comes to the butter’s temperature, room temperature is ideal for creaming with sugars, as it allows for better incorporation of air, leading to a lighter texture. If you forget to take your butter out ahead of time, you can soften it in the microwave for a few seconds, but be careful not to melt it.
Eggs: The Binding Agent and Their Role in Texture
Eggs are critical for binding the ingredients and adding moisture. They help create a rich and chewy cookie, while also providing structure. If you prefer a denser cookie, consider using an extra egg yolk to enhance the richness. Conversely, you can use egg substitutes like applesauce or flaxseed meal for a vegan option, but keep in mind that these may alter the final texture slightly.
Chocolate: Types of Chocolate Chips and Their Flavor Profiles
When it comes to chocolate, the options are endless. Semi-sweet chocolate chips are the classic choice, but dark chocolate can provide a more intense flavor, while milk chocolate tends to be sweeter. For a gourmet touch, try using chocolate chunks or baking chocolate for a more decadent experience. The size of the chocolate pieces can also affect the melting and distribution in the dough, so choose what best suits your preference.
Optional Add-ins: Nuts, Sea Salt, and Other Flavor Enhancers
To personalize your cookies, consider adding nuts, such as walnuts or pecans, for added crunch and flavor. A sprinkle of flaky sea salt on top of your cookies just before baking can also enhance the sweetness and provide a delightful contrast. Other flavor enhancers, like vanilla extract or spices, can add depth to your cookies, making them truly memorable.
Preparing Your Kitchen for Baking
Before you start baking, it’s essential to prepare your kitchen effectively. A well-organized workspace can make the process smoother and more enjoyable, ensuring you have everything you need at your fingertips.
Essential Baking Tools and Equipment
Make sure you have the following tools ready before you begin:
– Mixing bowls: A set of various sizes for mixing ingredients.
– Measuring cups and spoons: Accurate measurements are crucial for successful baking.
– Electric mixer: A stand mixer or handheld mixer will make creaming butter and sugar easier.
– Spatula: For scraping down the sides of your mixing bowl and folding in ingredients.
– Baking sheets: Use heavy-duty, non-stick baking sheets for even baking.
– Parchment paper: Lining your baking sheets with parchment paper can prevent sticking and make cleanup easier.
– Cooling rack: Allowing cookies to cool on a rack helps maintain their texture.
Importance of Workspace Organization
An organized workspace can significantly improve your baking experience. Gather all your ingredients beforehand, measure them out, and arrange your tools for easy access. This preparation minimizes distractions and allows you to focus on creating the perfect cookie dough.
Temperature and Humidity Considerations
Baking can be influenced by environmental factors such as temperature and humidity. If you live in a humid climate, you may need to adjust the amount of flour used to ensure your cookies don’t become too sticky. Conversely, in very dry conditions, adding a bit more liquid may help achieve the right dough consistency. Always keep an eye on the dough as you mix, ensuring it reaches the desired texture before baking.
The Step-by-Step Process of Making Chocolate Chip Cookies
Once you’re equipped and your ingredients are prepped, it’s time to dive into the fun part—making the cookie dough! Here’s a step-by-step process to guide you through creating the perfect chocolate chip cookies.
Preparing the Dough
1. Preheat Your Oven: Start by preheating your oven to 350°F (175°C). This ensures that your cookies bake evenly.
2. Combine Dry Ingredients: In a medium bowl, whisk together your chosen flour, baking soda, and salt. This step helps distribute the leavening agent evenly throughout the flour, ensuring consistent rise in your cookies.
3. Cream Butter and Sugars: In a large mixing bowl, combine the softened butter, granulated sugar, and brown sugar. Using an electric mixer, cream the butter and sugars together on medium speed until the mixture is light and fluffy, typically about 2-3 minutes. This process is crucial as it incorporates air into the butter, helping to create a tender cookie.
4. Add the Eggs and Vanilla: Once the butter and sugars are well combined, add in the eggs one at a time, mixing well after each addition. Then, stir in the vanilla extract. This combination of wet ingredients will contribute to the overall flavor and moisture of your cookies.
As you continue with the remaining steps in making your chocolate chip cookies, remember to keep the quality of your ingredients and the method in mind. Each choice impacts the final product, and with patience and practice, you’ll be on your way to baking the perfect batch of chocolate chip cookies that will have everyone reaching for seconds.
Incorporating Eggs and Vanilla
Once your chicken is marinated and ready for cooking, it’s time to bring it all together. Start by heating your skillet or grill pan over medium-high heat. While the pan is heating, whisk together the eggs and vanilla in a separate bowl. The eggs help to create a rich and moist texture for the fajitas, while the vanilla adds a subtle sweetness that balances the heat of the jalapeños. Although the original recipe focuses on the fiery components, this step enhances the overall flavor profile.
Gradually Adding Dry Ingredients
Next, it’s time to prepare your dry ingredients. In a separate bowl, combine flour, baking soda, and a pinch of salt. Gradually add this mixture to the egg and vanilla blend, ensuring to mix thoroughly after each addition. This gradual integration prevents clumping and ensures that the ingredients are evenly distributed throughout your dough. Once combined, the dough should be thick and slightly sticky, perfect for shaping into the fajitas.
Folding in Chocolate Chips and Optional Ingredients
In the context of our spicy fajitas, we can think of the optional ingredients as the toppings and extras that elevate the dish. While chocolate chips are not a traditional component of fajitas, you can consider customizing your dish with additional options like diced avocado, fresh cilantro, or even a sprinkle of cheese. Fold in these ingredients gently to maintain the structure of your fajitas. If you prefer a richer flavor, consider adding a tablespoon of lime zest to complement the marinated chicken.
The Chilling Process: Why It Matters
Although chilling is often overlooked in many recipes, allowing your chicken mixture to rest for at least 30 minutes can significantly enhance the flavors. This step permits the spices and lime juice to penetrate the chicken fully, resulting in a more robust and well-rounded taste. The chilling process also helps the chicken to retain moisture during cooking, contributing to tender and juicy fajitas.
Shaping and Baking Your Fajitas
Techniques for Portioning Chicken Fajitas
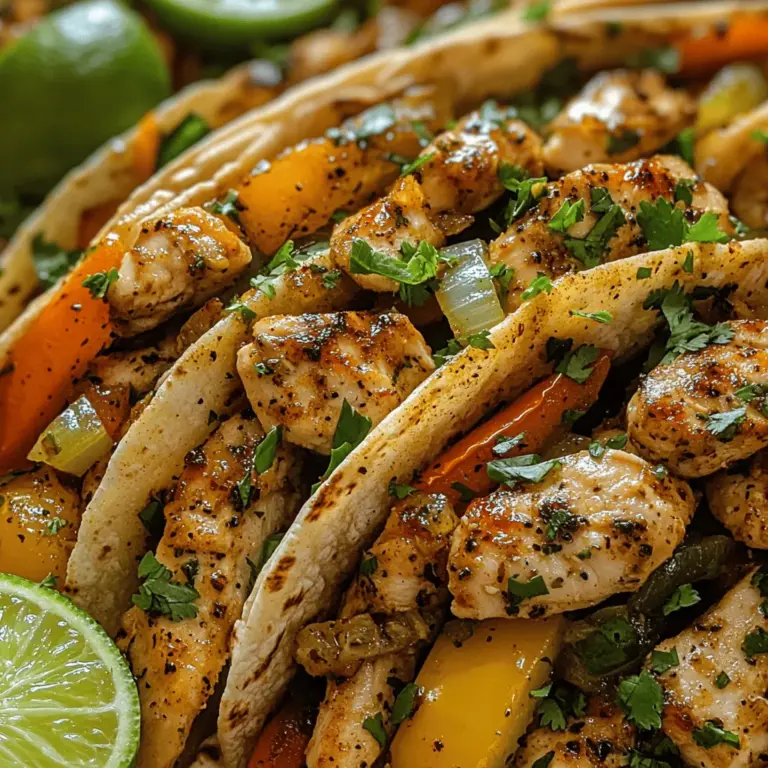
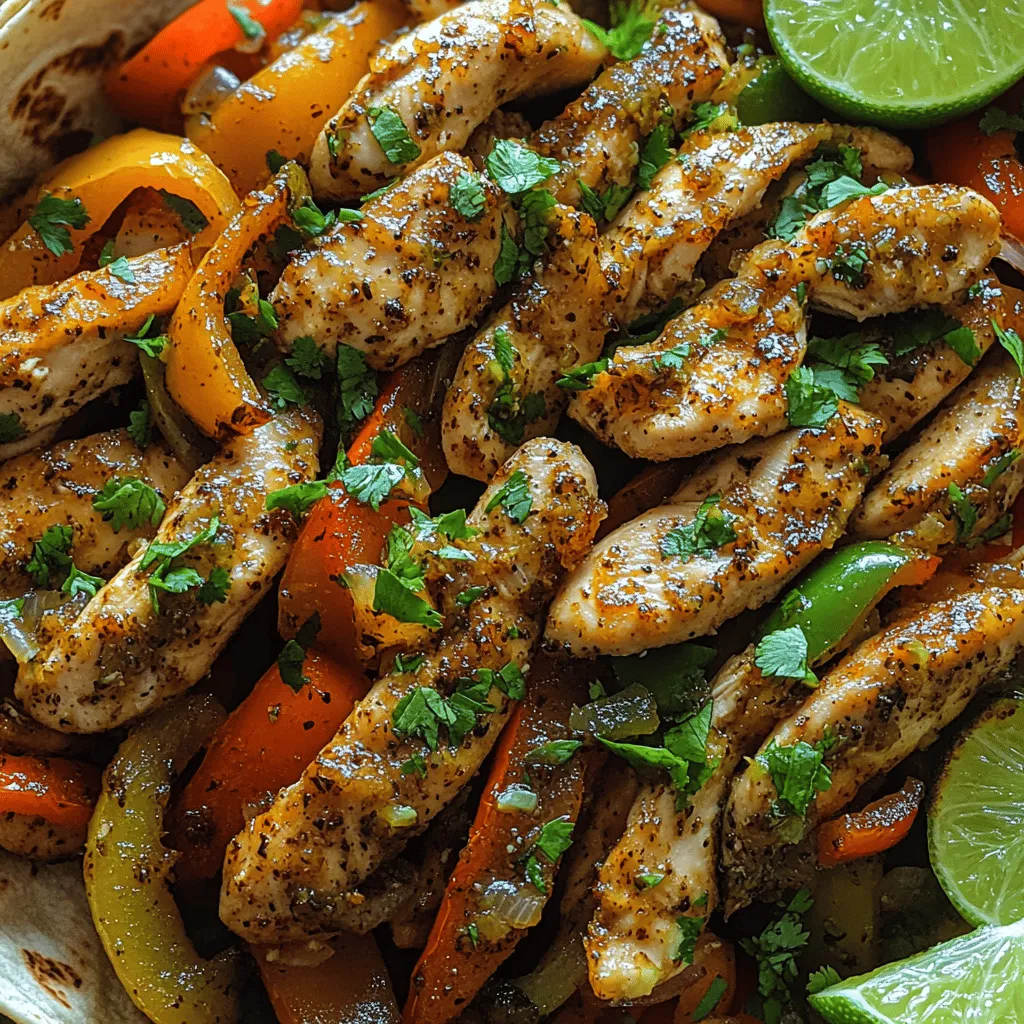
When shaping your fajitas, portion control is crucial. Using a pair of tongs, remove the marinated chicken from the bowl and place it directly onto the heated skillet or grill pan. Depending on the size of your chicken pieces, aim for uniform thickness to ensure even cooking. If you prefer smaller fajitas, slice the chicken breasts into strips before cooking. This will allow them to cook faster and absorb more flavor from the marinade.
Recommended Skillets and Pans
For the best results, utilize a cast-iron skillet or a non-stick grill pan. These types of cookware distribute heat evenly, which is essential for achieving that beautiful sear on your chicken. If you’re using a regular skillet, make sure to add a light coating of oil to prevent sticking. Preheat your skillet on medium-high heat before adding the chicken to achieve a nice char and lock in the juices.
Oven Preheating Tips and Temperature Control
If you’re opting to bake your chicken fajitas rather than pan-sear them, preheat your oven to 400°F (200°C). Baking can be a convenient method, especially when preparing a large batch. Ensure your oven is fully preheated before placing the chicken inside; this will help in achieving that perfect cook without drying out the meat. Use a meat thermometer to check the internal temperature of the chicken, which should reach 165°F (75°C) for safe consumption.
Baking Time and Signs of Doneness
The cooking time will depend on the method you choose. If you are grilling, allow the chicken to cook for about 6-8 minutes on each side, or until the juices run clear and the edges are slightly charred. For baked chicken, approximately 20-25 minutes should suffice. You can also test for doneness by cutting into the thickest part of the chicken to ensure it’s no longer pink. Once done, remove the chicken from the heat and let it rest for a few minutes before slicing.
Cooling and Storing Your Chicken Fajitas
The Importance of Cooling Fajitas on Wire Racks
After cooking, it’s tempting to dive right into your chicken fajitas. However, allowing them to cool on a wire rack for a few minutes is essential. This step prevents the chicken from becoming soggy by allowing steam to escape, preserving the crispiness of any added vegetables or tortillas.
Proper Storage Methods for Freshness
If you have leftovers, proper storage is key to maintaining their freshness. Place any remaining chicken fajitas in airtight containers. Store them in the refrigerator for up to three days. When reheating, use an oven or skillet to maintain texture rather than microwaving. This will help keep the fajitas from becoming rubbery.
Freezing Fajitas for Later Enjoyment
For longer storage, consider freezing your chicken fajitas. Allow them to cool completely before wrapping them tightly in plastic wrap and placing them in freezer bags. They can be stored in the freezer for up to three months. When you’re ready to enjoy, simply thaw in the refrigerator overnight and reheat in the oven at 350°F (175°C) until warmed through.
Exploring Variations of Chicken Fajitas
Classic Variations: Spicy vs. Mild
Fajitas are incredibly versatile, and you can customize the spice level based on your preferences. If you love heat, consider adding more jalapeños or even some serrano peppers to the marinade. For a milder option, reduce the jalapeño quantity or omit them entirely, relying instead on bell peppers for flavor and color.
Healthier Alternatives: Low-Calorie Options
For a healthier twist, try using lean chicken breasts or even substituting chicken with shrimp or tofu. Additionally, consider replacing traditional flour tortillas with lettuce wraps or whole grain alternatives to lower the calorie count while still enjoying the same great flavors.
Flavor Enhancements: Spices, Extracts, and Mix-Ins
Experiment with different spices to enhance the flavor of your fajitas. Adding cumin, smoked paprika, or chipotle powder can introduce a depth of flavor that complements the lime and jalapeños. Consider incorporating fresh herbs like cilantro or parsley for a fresh finish.
Pairing Suggestions for Your Chicken Fajitas
Beverage Pairings: Refreshing Drinks
Pair your fiery jalapeño lime chicken fajitas with refreshing beverages to balance out the heat. A classic option is a chilled glass of lemonade or iced tea. For adults, consider serving with a light beer, margarita, or even a crisp white wine like Sauvignon Blanc, which complements the citrus notes beautifully.
Serving Suggestions: Creative Presentation
When serving your fajitas, presentation is key. Set up a fajita bar with warm tortillas, sautéed onions and peppers, and a variety of toppings such as guacamole, sour cream, and fresh salsa. This allows guests to customize their fajitas, making for an engaging and interactive dining experience.
Conclusion
In conclusion, the joy of preparing fiery jalapeño lime chicken fajitas lies in their vibrant flavors and versatile nature. Whether you’re cooking for a casual family dinner or hosting a lively gathering, these fajitas are sure to impress. We encourage you to experiment with variations and make the recipe your own, whether by adjusting the spice level or exploring other protein options.
Homemade fajitas not only provide a delicious meal but also foster family traditions and create lasting memories around the dinner table. Embrace your culinary creativity, and enjoy the satisfaction of making this delightful dish from scratch. Happy cooking!
