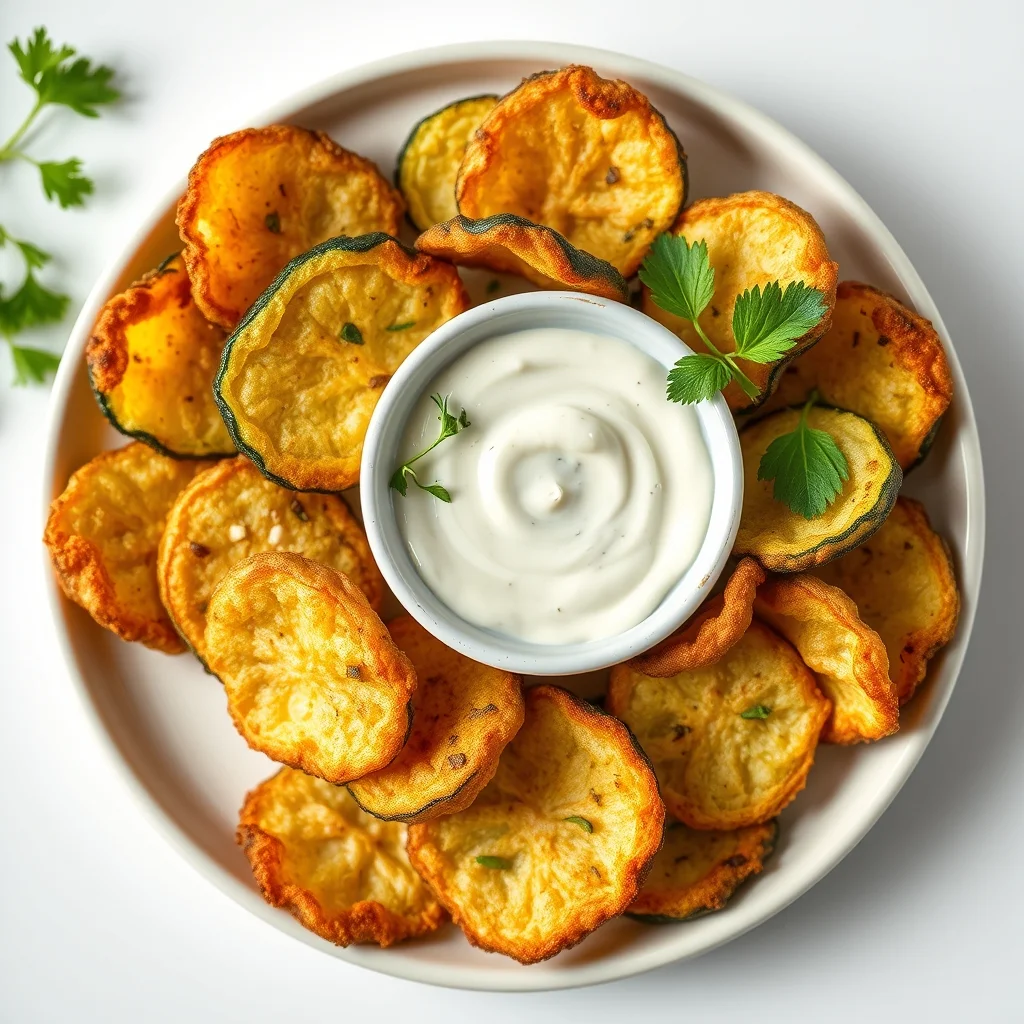
Crispy Herb & Garlic Aioli Zucchini Chips
 Save
Save
Imagine biting into a golden‑crunchy chip that bursts with fresh herb aroma and a silky garlic‑aioli dip—perfect for a lazy weekend brunch or a quick weekday treat. That’s exactly what Crispy Herb & Garlic Aioli Zucchini Chips deliver: a guilt‑free snack that feels indulgent without the deep‑fried guilt.
What sets this recipe apart is the balance between the light, airy crunch of thinly sliced zucchini and the rich, herb‑infused aioli that coats each bite. A quick toss in seasoned panko guarantees a satisfying texture, while the homemade aioli adds a luxurious, creamy finish.
This dish will win over veggie lovers, brunch enthusiasts, and anyone craving a wholesome alternative to potato chips. Serve it at a brunch buffet, as a side for eggs benedict, or as a standalone snack during a movie marathon.
The process is straightforward: slice, season, bake, and whip up a quick aioli. In under forty minutes you’ll have a plate of irresistibly crisp chips paired with a velvety dip that’s ready to devour.
Why You'll Love This Recipe
Bright, Herbaceous Flavor: Fresh thyme, rosemary, and parsley mingle with garlic, giving each chip a garden‑fresh punch that elevates any brunch spread.
Light Yet Satisfying: Baked instead of fried, the chips stay low‑calorie while still delivering that coveted crunch you associate with traditional chips.
Versatile Dip: The garlic‑aioli can be dressed up with lemon, smoked paprika, or even a dash of sriracha, letting you tailor the dip to any palate.
Quick Brunch Hero: From prep to plate in under forty minutes, this recipe fits perfectly into busy mornings without sacrificing flavor or presentation.
Tips & Tricks
Perfecting the Recipe
Uniform Slices. Consistent thickness guarantees even baking; a mandoline makes this effortless.
Dry Thoroughly. Pat the zucchini dry before oiling; moisture is the main culprit behind soggy chips.
Don’t Overcrowd. Give each slice space on the sheet; crowding traps steam and softens the crust.
Flip at Mid‑Bake. Turning the chips halfway ensures both sides achieve that golden crunch.
Flavor Enhancements
Add a pinch of smoked paprika to the panko for subtle warmth, or drizzle a teaspoon of truffle oil over the finished chips for an upscale twist. Stir a teaspoon of capers into the aioli for briny depth, and finish with a squeeze of fresh lemon just before serving.
Common Mistakes to Avoid
Skipping the drying step leaves excess water, resulting in limp chips. Also, baking at a temperature lower than 425°F prevents the panko from crisping and can make the chips chewy. Finally, serving the aioli straight from the fridge without a brief rest can keep the garlic flavor harsh.
Pro Tips
Use Fresh Herbs. Fresh parsley and thyme provide brighter, more aromatic notes than dried equivalents.
Cold Butter in Aioli. If you prefer a richer dip, whisk in a teaspoon of softened butter after the aioli is smooth.
Wire Rack Cooling. Let the chips cool on a wire rack to maintain their crunch; a solid plate traps steam.
Batch Baking. If making a large quantity, rotate trays halfway through baking to ensure uniform color.
Variations
Ingredient Swaps
Replace zucchini with thinly sliced sweet potatoes or parsnips for a heartier chip. Swap panko for crushed cornflakes for an extra‑crunchy texture. For a dairy‑free aioli, use a plant‑based mayo and add a splash of oat milk to thin it slightly.
Dietary Adjustments
To keep the dish gluten‑free, use certified gluten‑free breadcrumbs or almond flour. For a low‑carb version, omit the breadcrumbs entirely and simply brush the zucchini with olive oil and herbs before baking. The aioli is already keto‑friendly; just ensure the mayo contains no added sugars.
Serving Suggestions
Pair the chips with a light quinoa salad, a dollop of smoked salmon, or a sunny‑side‑up egg for a brunch plate. They also work as a crunchy topping for soups or as a side to avocado toast. The herb‑garlic dip doubles as a spread for sandwiches or a sauce for grilled fish.
Storage Info
Leftover Storage
Allow the chips and aioli to cool completely before transferring them to separate airtight containers. Store the chips in the refrigerator for up to 2 days; they’ll retain some crunch but are best eaten fresh. The aioli keeps for 5 days, covered, in the fridge.
Reheating Instructions
Re‑crisp the chips by spreading them on a baking sheet and heating at 350°F (175°C) for 5‑7 minutes, or until they regain their golden snap. Warm the aioli gently in a microwave‑safe bowl for 20‑30 seconds, stirring halfway, or let it sit at room temperature for 10 minutes before serving.
Frequently Asked Questions
Can I make the zucchini chips ahead of time?
What if I don’t have a mandoline?
Can I substitute the aioli with a dairy‑free dip?
This Crispy Herb & Garlic Aioli Zucchini Chips recipe delivers a satisfying crunch, bright herb notes, and a velvety dip—all in under forty minutes. By following the detailed steps, mastering the tips, and experimenting with the suggested variations, you’ll create a versatile brunch staple that feels both indulgent and wholesome. Feel free to tweak herbs, spices, or coatings to make it truly yours, and enjoy every bite of this fresh, flavorful creation.
Crispy Herb & Garlic Aioli Zucchini Chips
Delicious Crispy Herb & Garlic Aioli Zucchini Chips
Ingredients
Zucchini & Coating
- 2 large zucchini (about 1 lb)
- ½ cup panko breadcrumbs
- 2 tablespoons olive oil
- ½ teaspoon sea salt
Herb & Garlic Aioli
- ½ cup mayonnaise
- 2 cloves garlic, minced
- 1 tablespoon fresh lemon juice
- 1 teaspoon Dijon mustard
- 1 tablespoon chopped fresh parsley
- ½ teaspoon dried thyme
- Pinch of freshly ground black pepper
Instructions
Seasoning & Coating
- Mix Dry Ingredients. In a shallow bowl combine the panko, sea salt, and dried thyme. Toss gently so the flavors distribute evenly.
- Lightly Oil the Slices. Drizzle the olive oil over the zucchini ribbons and toss until each slice is just coated. The oil helps the breadcrumb mixture stick and promotes even browning.
- Coat with Panko. One by one, press each slice into the panko mixture, ensuring both sides are covered. A quick shake removes excess crumbs, leaving a thin, uniform crust.
- Arrange on Baking Sheet. Line a rimmed baking sheet with parchment. Lay the coated slices in a single layer, leaving a small gap between pieces so air can circulate and crisp the edges.
Making the Herb & Garlic Aioli
- Combine Base Ingredients. In a medium bowl whisk together mayonnaise, Dijon mustard, and lemon juice until smooth.
- Incorporate Aromatics. Add the minced garlic, chopped parsley, and dried thyme. Stir until evenly distributed.
- Season. Finish with a pinch of black pepper and taste. Adjust salt or lemon juice if you prefer a brighter profile.
- Rest. Cover the bowl and refrigerate the aioli for at least 10 minutes. This brief rest allows the garlic and herbs to mellow, creating a harmonious dip.
Similar Recipes
 Appetizers
White German Chocolate Cake – A Decadent & Unique Twist
Learn how to make delicious White German Chocolate Cake – A Decadent & Unique Twist. Easy…
 Appetizers
Irresistible Sticky Pecan Focaccia Bread
Learn how to make delicious Irresistible Sticky Pecan Focaccia Bread. Easy recipe with step-by-step instructions.
 Appetizers
warm carrot and parsnip soup with fresh thyme for winter comfort
Learn how to make delicious warm carrot and parsnip soup with fresh thyme for winter comfort.…
 Appetizers
Sweet & Smoky Grilled Corn and Avocado Salsa: A Summer Staple
Delicious Sweet & Smoky Grilled Corn and Avocado Salsa: A Summer Staple
 Appetizers
Cozy Creamy Tomato Basil Soup
Delicious Cozy Creamy Tomato Basil Soup
 Appetizers
Delicious Low-Calorie Air Fryer Eggplant for Guilt-Free Snacking
Learn how to make delicious Delicious Low-Calorie Air Fryer Eggplant for Guilt-Free Snacking. Easy recipe with…
 Appetizers
Sweet Potato Nachos Fiesta
Delicious Sweet Potato Nachos Fiesta
 Appetizers
Garlic Parmesan Chicken Skewers Recipe
Learn how to make delicious Garlic Parmesan Chicken Skewers Recipe. Easy recipe with step-by-step instructions.

Clara
I cook these recipes at home before they ever land here — simple ingredients, clear steps.