Delight in Mini Banana Split Cheesecakes: A Creamy Twist on a Classic Dessert
 Save
Save
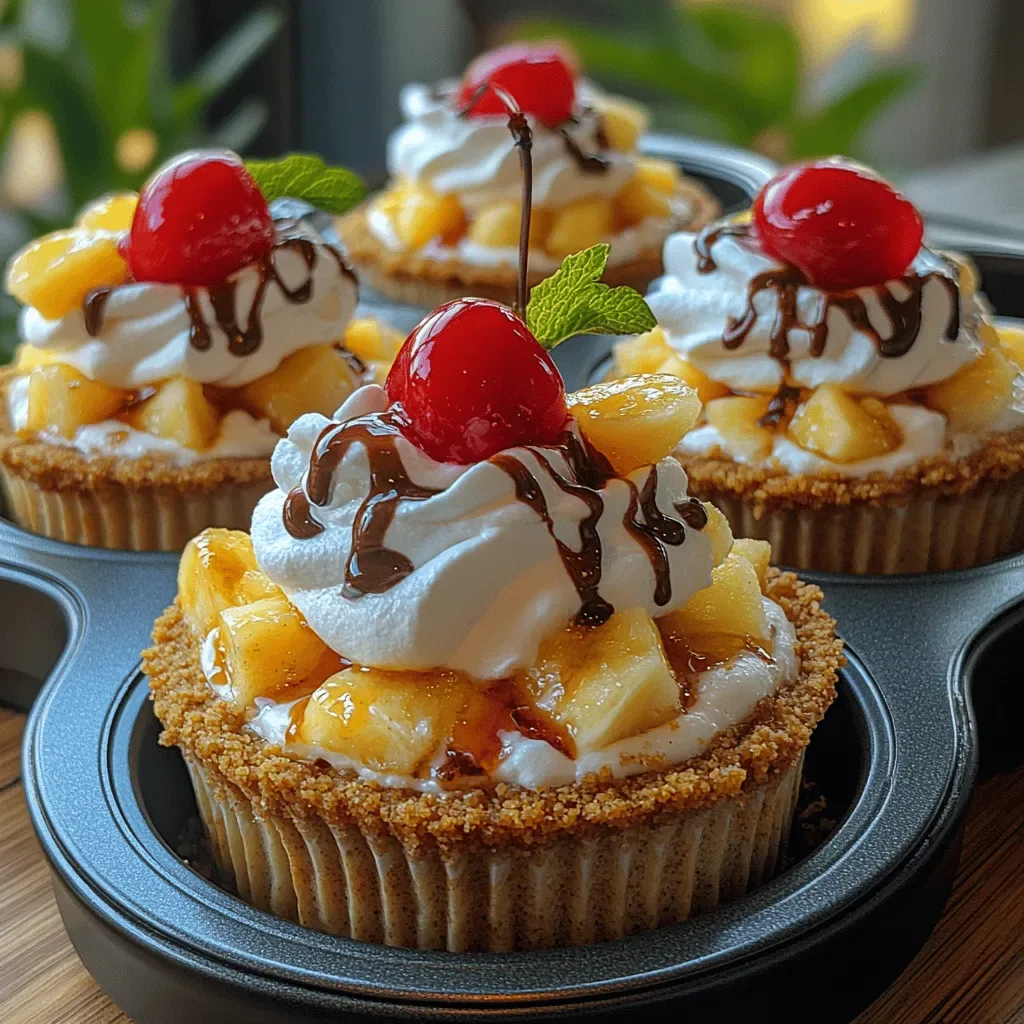
Imagine the classic banana split—bananas, scoops of ice cream, cherries, chocolate and strawberry sauces—reimagined as a bite‑size, creamy cheesecake. These Mini Banana Split Cheesecakes capture that nostalgic flavor while adding a velvety, tangy cheesecake base that melts in your mouth.
What makes them truly special is the marriage of a buttery graham‑cracker crust, a light ricotta‑cream cheese filling, and a trio of swirled fruit sauces that mimic the iconic ice‑cream scoops. Each bite delivers a perfect balance of sweet, tart, and buttery notes.
Kids, dessert lovers, and anyone craving a playful twist on a retro favorite will adore these treats. They shine at birthday parties, brunch buffets, or as an elegant finish to a dinner party.
The process is straightforward: blend a simple crust, whisk a fluffy filling, pipe the mixture into ramekins, bake just until set, then top with banana slices, fruit sauces, whipped cream, and a cherry. A quick chill and you’re ready to serve.
Why You'll Love This Recipe
Retro Meets Refined: The familiar banana‑split flavors are presented in an elegant, bite‑size cheesecake format, turning a nostalgic treat into a sophisticated dessert.
Easy to Portion: Mini ramekins provide consistent serving sizes, making it simple to serve a crowd without the guesswork of cutting a large cake.
Customizable Toppings: Swap strawberry, chocolate, or caramel sauces, add nuts or toasted coconut, and personalize each cheesecake to suit any palate.
Make‑Ahead Friendly: The cheesecakes can be baked and chilled a day ahead, allowing you to focus on other party details the day of.
Tips & Tricks
Perfecting the Recipe
Room‑temperature cheeses. Let cream cheese and ricotta sit out for 15 minutes before mixing; this prevents lumps and yields a smoother batter.
Don’t over‑bake. The centers should still jiggle slightly when you tap the ramekin. Over‑baking creates a dry, crumbly texture.
Use a water bath. Placing the ramekins in a shallow pan of hot water helps regulate temperature and prevents cracks.
Flavor Enhancements
Add a splash of Amaretto or rum to the filling for an adult twist. For extra fruit brightness, stir a teaspoon of fresh lemon zest into the strawberry sauce. A pinch of sea salt on the chocolate drizzle balances the sweetness beautifully.
Common Mistakes to Avoid
Skipping the chill before adding toppings can cause the sauces to melt and slide off. Also, avoid using overly ripe bananas—they become mushy under the chilled cheesecake. Choose firm, just‑ripe bananas for the best texture.
Pro Tips
Pipe the filling. Using a pastry bag gives each ramekin a uniform height and a professional appearance.
Chill the ramekins. Placing the empty ramekins in the freezer for 5 minutes before adding crust helps the butter solidify faster.
Finish with a glaze. Warm the chocolate sauce slightly and brush a thin layer over the top before adding whipped cream for a glossy finish.
Variations
Ingredient Swaps
Replace the graham‑cracker crust with a chocolate cookie crumb base for a richer flavor. Swap ricotta for mascarpone for an ultra‑creamy texture, or use Greek yogurt for a tangier, lower‑fat option. Fresh berries can stand in for pineapple if you prefer a berry‑centric topping.
Dietary Adjustments
For a gluten‑free version, use gluten‑free graham crackers or almond flour for the crust. Vegan diners can substitute dairy cream cheese with a plant‑based alternative, coconut‑based whipped cream, and use agave‑sweetened fruit sauces. Keto lovers can reduce the sugar in the sauces and use erythritol in the whipped cream.
Serving Suggestions
Pair these mini cheesecakes with a light espresso or a chilled glass of sparkling rosé. For brunch, serve alongside fresh fruit salad and a mimosa. A small scoop of sorbet on the side adds an extra pop of temperature contrast.
Storage Info
Leftover Storage
Once the cheesecakes have chilled, cover the ramekins tightly with plastic wrap or place them in an airtight container. Store in the refrigerator for up to 4 days. For longer keeping, freeze the un‑topped cheesecakes (no fresh fruit) in a freezer‑safe bag for up to 2 months; add toppings after thawing.
Reheating Instructions
Mini cheesecakes are best served cold, but if you prefer a softer texture, let them sit at room temperature for 15‑20 minutes before plating. Avoid microwaving, as it can cause the filling to crack. If you must, use a low‑power setting (30 % power) for 20 seconds, then top with fresh fruit.
Frequently Asked Questions
Can I make these mini cheesecakes a day ahead?
What if I don’t have ricotta cheese?
Can I use frozen bananas for the topping?
How long can the topped cheesecakes sit before serving?
This mini banana split cheesecake recipe delivers a playful nod to a timeless classic while offering a light, creamy bite that’s perfect for any celebration. You now have every detail—from crust to topping, storage to variations—to make these desserts shine on your table. Feel free to experiment with sauces, crusts, or even a splash of liqueur to tailor them to your taste. Serve chilled, watch the smiles appear, and enjoy every delightful forkful!
Delight in Mini Banana Split Cheesecakes: A Creamy Twist on a Classic Dessert
Delicious Delight in Mini Banana Split Cheesecakes: A Creamy Twist on a Classic Dessert
Ingredients
Crust
- 1 cup graham‑cracker crumbs
- 2 tablespoons unsalted butter, melted
- 1 tablespoon granulated sugar
Cheesecake Filling
- 8 oz cream cheese, softened
- 1 cup whole‑milk ricotta cheese
- 1/3 cup powdered sugar
- 1 teaspoon vanilla extract
- 2 large eggs, lightly beaten
Banana Split Toppings
- 2 ripe bananas, sliced lengthwise
- 1/2 cup strawberry sauce (store‑bought or homemade)
- 1/2 cup chocolate sauce
- 1/2 cup pineapple chunks, lightly drained
Whipped Cream & Garnish
- 1 cup heavy whipping cream
- 2 teaspoons powdered sugar (for the cream)
- Maraschino cherries, for garnish
Instructions
Making the Cheesecake Filling
- Blend the cheeses. In a large mixing bowl, beat the cream cheese until smooth, then fold in the ricotta cheese. This creates a light, airy texture that keeps the mini cheesecakes from feeling dense.
- Sweeten and flavor. Add the powdered sugar and vanilla extract. Beat on low speed until just incorporated; over‑mixing can incorporate too much air, leading to cracks after baking.
- Incorporate the eggs. Drizzle the lightly beaten eggs into the cheese mixture while the mixer runs on low. The eggs act as a gentle binder, giving the cheesecake its characteristic “set but still creamy” mouthfeel.
- Fill the ramekins. Using a rubber spatula, spoon the batter over the crusts, filling each ramekin about three‑quarters full. Smoothing the tops with the spatula creates an even surface for the toppings later.
Similar Recipes
 Desserts
Frozen Yogurt Mocha Cookie Cups Recipe
Delicious Frozen Yogurt Mocha Cookie Cups Recipe
 Desserts
Pumpkin Banana Chia Bread Recipe
Delicious Pumpkin Banana Chia Bread Recipe
 Desserts
Butterscotch Toffee Pudding Cups: A Delightful Dessert Experience
Delicious Butterscotch Toffee Pudding Cups: A Delightful Dessert Experience
 Desserts
Kid-Friendly Banana Cream Pie Smoothie Bowl
Learn how to make delicious Kid-Friendly Banana Cream Pie Smoothie Bowl. Easy recipe with step-by-step instructions,…
 Desserts
Brown Butter Snickerdoodle Bars: A Delicious Twist on a Classic Treat
Delicious Brown Butter Snickerdoodle Bars: A Delicious Twist on a Classic Treat
 Desserts
Tropical Bliss Coconut Rice Cakes: A Delightful Journey to the Tropics
Delicious Tropical Bliss Coconut Rice Cakes: A Delightful Journey to the Tropics
 Desserts
Easy Crockpot Caramel Apple Dump Cake Recipe
Learn how to make delicious Easy Crockpot Caramel Apple Dump Cake Recipe. Easy recipe with step-by-step…
 Desserts
Blueberry Bliss Bites: The Ultimate Recipe Guide
Delicious Blueberry Bliss Bites: The Ultimate Recipe Guide

Clara
I cook these recipes at home before they ever land here — simple ingredients, clear steps.