Introduction
There’s something undeniably charming about homemade pastries. The warm, buttery aroma wafting through the kitchen, the delicate layers of dough that give way to a luscious filling—these are the experiences that make baking a rewarding endeavor. Among the myriad of pastry options, Heavenly Strawberry Danish Delights stand out as a perfect treat for any occasion. Whether you’re celebrating a special event, hosting a brunch, or simply indulging in a sweet snack, these delightful pastries are sure to impress.
What sets these Danish delights apart is not just their irresistible taste but also the use of fresh, high-quality ingredients. Each component plays a crucial role in achieving the perfect balance of flavor and texture, ensuring that every bite is a heavenly experience. In this article, we’ll explore the intricacies of Danish pastry and guide you through making your own Heavenly Strawberry Danish Delights from scratch.
Understanding Danish Pastry
Danish pastry, often simply referred to as “Danish,” has a rich history that dates back to the 19th century in Denmark. The origins of this beloved pastry can be traced back to Austrian bakers who migrated to Denmark, bringing with them their techniques for making laminated dough. Over time, Danish bakers adapted these methods, creating a unique pastry that has become an integral part of Danish culture and cuisine.
What makes Danish pastries so special is their unique texture and flavor profile. Unlike other pastries, Danish dough is laminated, which means it is layered with butter and rolled multiple times to create thin, flaky layers. This process results in a light, airy texture that contrasts beautifully with the rich and buttery flavor of the dough. Danish pastries can be filled with a variety of ingredients, from fruits and nuts to creams and custards, making them incredibly versatile and appealing to a wide range of palates.
Culturally, Danish pastries are often enjoyed during festivities and special occasions. They are commonly found in bakeries across Denmark and are a staple at celebrations such as birthdays, holidays, and gatherings. This cultural significance adds an extra layer of joy to the experience of making and sharing these pastries at home.
The Magic of Ingredients in Strawberry Danish Delights
Danish Dough Composition
The foundation of any great Danish pastry is its dough. The ingredients you choose play a pivotal role in creating that signature flaky texture and rich flavor. Here’s a closer look at the essential components of the dough:
– All-Purpose Flour: The backbone of the Danish dough, all-purpose flour provides the necessary structure. It contains a moderate amount of protein, which helps develop gluten—key to achieving the desired elasticity and chewiness without becoming tough.
– Granulated Sugar: Not just for sweetness, sugar also contributes to the browning of the pastry during baking. This caramelization adds depth of flavor and enhances the overall appearance of the Danish.
– Salt: Often an overlooked ingredient, salt is crucial in pastry making. It enhances flavors, balances sweetness, and strengthens the gluten structure, resulting in a more robust dough.
– Instant Yeast: As a leavening agent, instant yeast helps the dough rise and develop that airy, fluffy texture. One of its primary benefits is that it can be mixed directly with dry ingredients without needing to be activated first, saving time and effort.
– Cold Butter: Temperature is key in pastry making. Using cold butter creates distinct layers in the dough. As the butter melts during baking, it creates steam, which helps achieve that flaky, tender texture we all love in Danish pastries.
– Milk, Eggs, and Vanilla Extract: These ingredients work together to enrich the dough. Milk adds moisture and fat, eggs provide richness and structure, and vanilla extract introduces a lovely flavor that complements the sweetness of the pastry.
Strawberry Filling Essentials
The filling is where the Heavenly Strawberry Danish Delights truly shine. Fresh strawberries are the star of this recipe, and here’s why they matter:
– Fresh Strawberries: Not only do they provide a burst of vibrant color, but fresh strawberries also offer a perfect balance of sweetness and tartness. They are packed with vitamins and antioxidants, making them a deliciously healthy choice.
– Sugar: To balance the natural acidity of the strawberries, sugar is added. This not only sweetens the filling but also helps to draw out the juices from the fruit, creating a luscious compote-like consistency.
– Cornstarch: As a thickening agent, cornstarch is essential in achieving the right texture for the filling. It helps bind the juices from the strawberries, preventing the filling from becoming too runny.
– Lemon Juice: A splash of lemon juice brightens the flavor of the filling and enhances the natural sweetness of the strawberries. The acidity also helps to balance the richness of the pastry.
– Vanilla Extract: Just like in the dough, vanilla extract elevates the flavor of the filling, adding a warm and inviting note that complements the fruity goodness.
Cream Cheese Glaze
To take these Danish delights over the top, we can’t forget the cream cheese glaze. Here’s how it enhances the overall experience:
– Cream Cheese and Powdered Sugar: The combination of cream cheese and powdered sugar creates a rich, creamy glaze that adds a touch of sweetness to the pastry. This glaze not only enhances the flavor but also gives the Danish a beautiful, glossy finish.
– Complementing Sweetness: The tanginess of the cream cheese balances the sweetness of the Danish, providing a harmonious blend of flavors that makes each bite even more irresistible.
– Presentation: A drizzle of glaze adds an elegant touch, making your Heavenly Strawberry Danish Delights not only delicious but visually appealing as well.
Step-by-Step Guide to Making Heavenly Strawberry Danish Delights
Preparation of the Danish Dough
Now that we’ve explored the essential ingredients, it’s time to roll up our sleeves and start making the dough. Follow these detailed instructions for a successful Danish pastry:
1. Gather Your Ingredients: Before you begin, ensure you have all your ingredients measured and ready to go. This will streamline the process and make it easier to focus on each step.
2. Mix the Dry Ingredients: In a large mixing bowl, combine 2 cups of all-purpose flour, 2 tablespoons of granulated sugar, and 1 teaspoon of salt. Whisk these together until well combined. This step is crucial as it evenly distributes the sugar and salt throughout the flour.
3. Add the Instant Yeast: Stir in 1 packet (2 ¼ teaspoons) of instant yeast. Make sure to mix it thoroughly with the dry ingredients to activate its leavening properties when combined with the wet ingredients.
4. Incorporate the Wet Ingredients: In a separate bowl, whisk together ½ cup of cold milk, 1 large egg, and 1 teaspoon of vanilla extract. The milk should be cold to ensure that the butter remains firm when mixed in later.
5. Combine the Mixtures: Gradually pour the wet ingredient mixture into the dry ingredients, stirring gently with a spatula or wooden spoon until a shaggy dough forms. Avoid overmixing, as you want to keep the dough light and airy.
6. Add the Cold Butter: Take ½ cup (1 stick) of very cold unsalted butter and cut it into small cubes. Gently fold the cubed butter into the dough until just incorporated. The goal here is to create small pockets of butter throughout the dough, which will create flakiness during baking.
7. Knead the Dough: Turn the dough out onto a lightly floured surface and knead gently for about 1-2 minutes, just until the dough comes together. Be careful not to overwork it; a gentle touch is key.
8. Chill the Dough: Shape the dough into a rectangle, wrap it in plastic wrap, and refrigerate for at least 30 minutes. Chilling the dough helps the gluten relax and allows the butter to firm up, which is essential for creating those flaky layers.
9. Roll and Fold: After chilling, turn the dough out onto a floured surface. Use a rolling pin to roll it into a larger rectangle, about 12×18 inches. The thickness should be around ¼ inch. Fold the dough into thirds, like a letter, then roll it out again, repeating this process two more times. Each fold creates more layers, essential for that classic Danish texture.
10. Final Chill: Wrap the folded dough in plastic wrap once more and refrigerate for another 30 minutes. This final chilling period ensures the butter remains cold and firm, setting you up for the perfect bake.
With the dough prepared, you’ll be ready to move on to the next steps of assembling and baking your Heavenly Strawberry Danish Delights. Stay tuned for the delicious journey ahead!
Heavenly Strawberry Danish Delights: The Ultimate Recipe Guide (Part 2)
Importance of Kneading and Chilling the Dough for Optimal Texture
Creating the perfect dough for your Heavenly Strawberry Danish Delights is crucial to achieving a flaky, tender pastry. Kneading the dough properly helps develop gluten, which provides structure and chewiness to the pastry. However, it is equally important to chill the dough at intervals during the making process. Chilling allows the butter to remain solid, ensuring that it creates distinct layers during baking. This results in that delicious flaky texture we all love in a Danish pastry.
Creating the Strawberry Filling
The strawberry filling is the heart of this delightful treat. By using fresh strawberries, you can achieve a vibrant flavor that complements the pastry perfectly.
Step-by-Step Instructions for Cooking the Filling
1. Prepare the Strawberries: Start by washing and hulling about 2 cups of fresh strawberries. Chop them into small pieces, about 1/4 inch in size.
2. Cook the Mixture: In a medium saucepan, combine the chopped strawberries with 1/4 cup of granulated sugar, 1 tablespoon of lemon juice, and 1 tablespoon of cornstarch. The sugar will draw out the juices from the strawberries, while the cornstarch will help thicken the mixture.
3. Heat the Filling: Place the saucepan over medium heat. Stir the mixture continuously until it begins to bubble and thicken, usually about 5-7 minutes. Once thickened, remove from heat and let it cool while you prepare the dough.
Tips for Achieving the Right Consistency and Flavor Balance
– Taste Test: Adjust the sugar based on the ripeness of your strawberries. If they are particularly sweet, you might want to reduce the sugar slightly.
– Add Flavors: Consider adding a splash of vanilla extract or a pinch of cinnamon for an extra layer of flavor.
– Cooling: Allow the filling to cool completely before adding it to your dough to prevent it from melting the butter and ruining the layers.
Rolling Out the Dough
Once your dough is chilled and the strawberry filling is prepared, it’s time to roll out the dough. This process is vital for creating the flaky layers that characterize Danish pastries.
Techniques for Rolling and Folding the Dough to Create Layers
1. Flour Your Surface: Begin by lightly flouring your work surface to prevent sticking.
2. Roll the Dough: Use a rolling pin to roll out the dough into a rectangle, about 1/4 inch thick. Make sure the dough is evenly rolled to ensure consistent baking.
3. Folding Technique: Once rolled out, fold the dough into thirds, similar to folding a letter. This is known as a “turn.” Repeat the rolling and folding process two more times, chilling the dough for 30 minutes between each turn. This technique creates multiple layers of butter and dough, essential for flakiness.
Importance of Chilling the Dough Between Rolls for Flakiness
Chilling the dough after each turn gives the butter time to firm up, which prevents it from melting into the dough. This process ensures that when the pastries are baked, the steam from the butter creates those beautiful layers that make Danish pastries so desirable.
Shaping the Danishes
Now that your dough is rolled and folded, it’s time to shape it into the traditional Danish form.
Instructions for Cutting and Shaping Dough Squares
1. Cut the Dough: Begin by rolling out the dough into a rectangle once more. Use a sharp knife or pizza cutter to cut the dough into squares, approximately 4 inches by 4 inches.
2. Create the Shape: To shape each square, start by making a lengthwise cut about 1 inch from each corner, stopping short of the center. This will create flaps that you can fold over the strawberry filling.
Visual Description of How to Create the Traditional Danish Shape
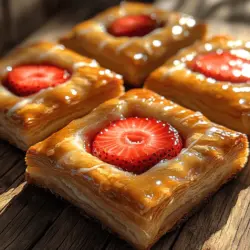
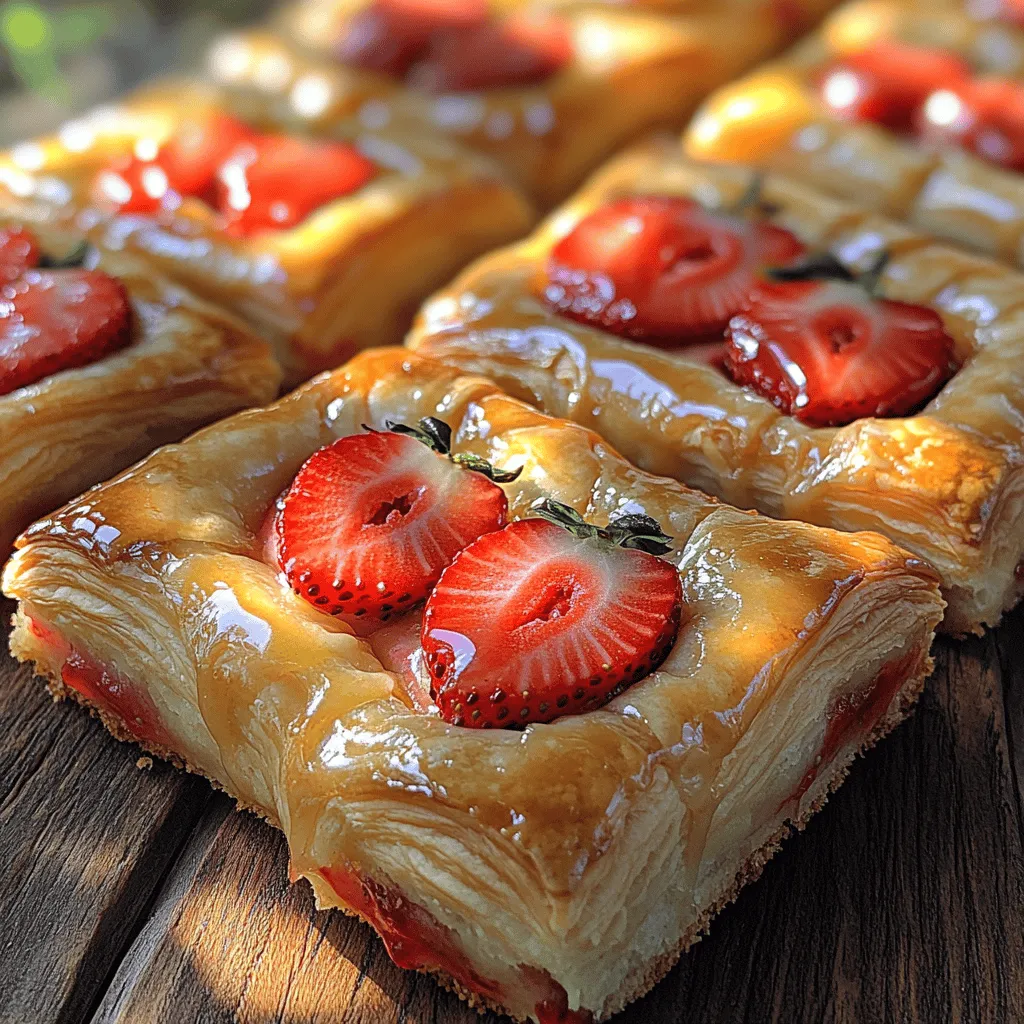
To create the quintessential Danish look, take the top flap of each corner and fold it over the center, slightly overlapping. Then do the same with the bottom flaps. This will create a lovely pinwheel effect, perfect for showcasing the vibrant strawberry filling.
Applying the Egg Wash
An egg wash is essential for giving your pastries that golden-brown finish that’s visually appealing and appetizing.
Importance of Egg Wash for Achieving a Golden-Brown Finish
The egg wash not only enhances the color but also adds a beautiful sheen to the pastries, making them irresistible.
Tips on How to Apply the Egg Wash Evenly
– Prepare the Wash: In a small bowl, whisk together one egg with 1 tablespoon of water or milk to create your egg wash.
– Application: Use a pastry brush to gently apply the egg wash over each pastry. Be careful not to let it pool in the center, as this can make the dough soggy.
Baking Process
The baking process is where your Heavenly Strawberry Danish Delights truly come to life.
Optimal Baking Temperatures and Times for Perfect Results
Preheat your oven to 400°F (200°C). Place the shaped pastries on a parchment-lined baking sheet, ensuring they are spaced apart to allow for expansion. Bake for 15-20 minutes or until they are puffed and golden brown.
Signs to Look for to Ensure the Pastries Are Baked Correctly
– Color: Look for a rich golden-brown color on the tops and edges.
– Puffiness: The pastries should be puffed up and airy, indicating that the layers have cooked through.
– Internal Temperature: If you have a kitchen thermometer, aim for an internal temperature of around 190°F (88°C).
Preparing the Cream Cheese Glaze
A cream cheese glaze adds a creamy, sweet finish to your pastries, enhancing their flavor and appearance.
Step-by-Step Instructions for Making the Glaze
1. Ingredients: In a medium bowl, combine 4 oz. of softened cream cheese, 1 cup of powdered sugar, 2 tablespoons of milk, and 1 teaspoon of vanilla extract.
2. Mix Together: Using a hand mixer or whisk, beat the mixture until it is smooth and creamy. If the glaze is too thick, add a little more milk until you reach your desired consistency.
Tips for Achieving the Right Consistency for Drizzling
Aim for a pourable consistency that will drizzle easily over the pastries. If it’s too thick, add more milk in small increments. If it’s too thin, add a bit more powdered sugar.
Final Assembly and Serving Suggestions
Now that your pastries are baked and cooled, it’s time for the final touches.
How to Glaze the Pastries for a Beautiful Finish
Using a spoon or a piping bag, drizzle the cream cheese glaze over each pastry once they have cooled slightly but are still warm. This creates a beautiful contrast with the warm strawberry filling.
Suggestions for Serving Warm or at Room Temperature
These Heavenly Strawberry Danish Delights can be enjoyed warm from the oven or at room temperature. They make a perfect addition to brunch, a delightful afternoon snack, or a beautiful dessert served with coffee or tea. For an added touch, serve them with fresh strawberries or a scoop of vanilla ice cream for a stunning presentation.
Nutritional Information
Strawberries are not only delicious but also packed with nutrients. They are low in calories and high in vitamin C, fiber, and antioxidants, making them a healthful addition to your diet. The cream cheese and butter do add a bit of richness, so enjoy these pastries in moderation.
Overview of the Nutritional Benefits of Strawberries and Other Ingredients
– Strawberries: Rich in antioxidants, vitamin C, and fiber, strawberries support heart health and boost the immune system.
– Cream Cheese: Provides calcium and protein, enhancing the overall nutrition of the pastry.
– Butter and Sugar: While indulgent, they offer flavor and texture that are vital to the pastry’s appeal.
Discussion on Serving Sizes and Indulgence
A serving size of one Danish is typically sufficient to satisfy your sweet tooth without overindulging. Enjoy them as an occasional treat, and consider pairing with a healthy meal for balance.
Conclusion
Baking Heavenly Strawberry Danish Delights is not just about creating an exquisite treat; it’s about the joy of making something from scratch and sharing it with loved ones. The process of kneading, rolling, and shaping the dough, combined with the vibrant strawberry filling, creates a culinary experience that is both rewarding and delicious.
As you embark on this baking adventure, remember that it’s not just about the final product, but also about the creativity and love that goes into each step. So gather your ingredients, roll up your sleeves, and let the aroma of freshly baked pastries fill your kitchen, bringing happiness to all who partake. Enjoy the satisfaction of homemade pastries and the smiles they bring to those you share them with. Happy baking!