In recent years, snack bars have surged in popularity as convenient and nutritious options for those seeking a balanced diet. Whether you’re on the go, at the office, or simply need a quick pick-me-up during the day, snack bars offer a perfect blend of sustenance and satisfaction. Among the myriad of options available, Trail Mix Crunch Bars stand out as a wholesome, easy-to-make treat that not only delights the palate but also nourishes the body.
These bars are a delightful culmination of simple yet wholesome ingredients, making them an ideal choice for anyone looking to enhance their snack game. With a base of oats, an assortment of nuts and seeds, and the natural sweetness of dried fruits, Trail Mix Crunch Bars pack a nutritional punch. They are not only delicious but also provide a host of health benefits, which we’ll explore as we dive into the recipe.
The Appeal of Trail Mix Crunch Bars
One of the most compelling reasons to make your own Trail Mix Crunch Bars at home is the control it gives you over the ingredients. Unlike many store-bought snack bars that are often laden with added sugars, preservatives, and artificial flavors, homemade bars allow you to curate exactly what goes into them. This means you can ensure that every ingredient is wholesome and beneficial for your body.
Customization is another fantastic aspect of making your own bars. You can experiment with various nut butters, switch up the types of dried fruits to suit your taste, and even add in extras like seeds or dark chocolate to create a unique flavor profile. This versatility makes Trail Mix Crunch Bars suitable for a variety of occasions; they can serve as a quick snack at work, an energy-boosting post-workout treat, or a delightful addition to school lunchboxes.
Ingredients Breakdown
Before we dive into the preparation of these delicious Trail Mix Crunch Bars, let’s take a closer look at the key ingredients and their nutritional benefits:
Rolled Oats
The foundation of our Trail Mix Crunch Bars is rolled oats. High in fiber, oats are an excellent source of sustained energy. They help keep you feeling full longer, making them an ideal ingredient for a snack that will carry you through the day. Additionally, oats are packed with vitamins and minerals, including magnesium, iron, and B vitamins.
Nut Butter
Nut butter, whether it’s almond, peanut, or cashew, serves as both a binding agent and a source of healthy fats and protein. Nut butters are not only delicious but also provide essential nutrients, such as vitamin E and magnesium. When choosing a nut butter, opt for natural varieties without added sugars or hydrogenated oils to maximize health benefits.
Sweeteners
For sweetness, you have the option of using honey or maple syrup. Both natural sweeteners add unique flavors to your bars. Honey offers a floral sweetness that pairs well with nuts, while maple syrup provides a rich, caramel-like flavor. Both sweeteners have their own set of benefits, such as antioxidants in honey and minerals like manganese and zinc in maple syrup.
Mixed Nuts
A blend of mixed nuts elevates the nutritional profile of your bars. Nuts like almonds, walnuts, and pecans are rich in healthy fats, protein, and essential vitamins and minerals. They also add a satisfying crunch to the texture of the bars. Almonds, for example, are high in vitamin E, while walnuts provide omega-3 fatty acids, making them a heart-healthy choice.
Dried Fruits
Dried fruits bring a burst of natural sweetness and additional nutrients to the mix. Options like raisins, cranberries, or apricots are packed with vitamins, antioxidants, and fiber. They also contribute a chewy texture that contrasts beautifully with the crunch of the nuts and seeds.
Dark Chocolate Chips or Cacao Nibs
For those who enjoy a bit of indulgence, adding dark chocolate chips or cacao nibs can enhance the flavor and provide mood-boosting properties. Dark chocolate is rich in antioxidants and has been linked to various health benefits, including improved heart health and enhanced cognitive function.
Salt
Though it may seem like a simple ingredient, a pinch of salt is crucial for enhancing the overall flavor of your Trail Mix Crunch Bars. It helps balance the sweetness and brings out the rich flavors of the nuts and dried fruits.
Optional Seeds
To boost the nutritional value further, consider adding optional seeds such as pumpkin or sunflower seeds. These tiny powerhouses are rich in vitamins, minerals, and healthy fats, making them an excellent addition to your bars.
Step-by-Step Instructions
Now that we’ve covered the ingredients and their benefits, let’s move on to the preparation of your Trail Mix Crunch Bars.
Preparing the Pan
Start by preparing your baking pan. Line an 8×8-inch square pan with parchment paper, allowing some overhang on the sides. This will make it easy to lift the bars out of the pan once they have cooled. Parchment paper also prevents sticking, ensuring that your bars maintain their shape.
Mixing Wet Ingredients
In a medium saucepan over low heat, combine your chosen nut butter and sweetener. Stir gently until the mixture is smooth and well combined. It’s essential to monitor the temperature; you want the nut butter to be warm enough to blend easily with the sweetener but not so hot that it loses its nutritional benefits. Aim for a creamy consistency that will help bind the dry ingredients together.
Combining Dry Ingredients
In a large mixing bowl, combine the rolled oats, mixed nuts, dried fruits, and any optional seeds you wish to include. Stir until all the dry ingredients are well mixed. This step is crucial for ensuring that every bite of your Trail Mix Crunch Bars is packed with flavor and texture.
As you prepare for the next steps, keep in mind that the key to successful Trail Mix Crunch Bars lies in the balance of wet and dry ingredients. The right consistency will ensure your bars are chewy yet firm enough to hold together when cut.
With the pan prepared, wet ingredients mixed, and dry ingredients combined, you are well on your way to creating these delectable Trail Mix Crunch Bars. Stay tuned for the upcoming sections where we will guide you through the final mixing process and how to bake and cut your bars for optimal enjoyment.
Mixing Wet & Dry Mixtures
Achieving a delicious Trail Mix Crunch Bar begins with the proper mixing of wet and dry ingredients. Start by combining your dry ingredients—such as oats, nuts, seeds, and any other mix-ins— in a large mixing bowl. This ensures an even distribution of flavors and textures throughout the bars.
In a separate bowl, whisk together your wet ingredients, which usually consist of nut butter, honey or maple syrup, and any additional flavorings like vanilla extract. The key to a successful bar is ensuring that your wet mixture is well-blended before combining it with the dry ingredients. This helps achieve a uniform coating, allowing each component to be adequately flavored and held together.
Techniques for Achieving the Perfect Coating of Ingredients
When combining the wet and dry mixtures, pour the wet ingredients into the bowl containing the dry ingredients gradually. Use a spatula or wooden spoon to gently fold them together. This method prevents the mixture from becoming too compact and ensures that every bit of the dry mix gets coated evenly.
For optimal results, work quickly yet delicately to maintain the texture of the oats and nuts. If you find the mixture is too dry, add a little more nut butter or sweetener until it reaches a consistency that holds together when pressed.
Pressing Mixture into the Pan
Once your mixture is thoroughly combined, it’s time to transfer it to a lined baking pan—typically an 8×8-inch or 9×9-inch pan works well for this recipe. To ensure that your bars come out easily, line the pan with parchment paper, leaving some overhang for easy removal later.
Using your hands or a spatula, firmly press the mixture into the pan. It’s crucial to apply even pressure and make sure the mixture is compact. This compactness is vital for the structure of the bars; if they are too loose, they may crumble when sliced.
Chilling Process
After you’ve pressed the mixture into the pan, it’s time to chill. Place the pan in the refrigerator for at least 1-2 hours, or until the mixture has firmed up. Chilling is not just a waiting game; it plays a significant role in the final texture of your bars.
The cold helps to solidify the fats from the nut butter, aiding in binding the ingredients together. Well-chilled bars will have a firmer texture, making them easier to cut and chew.
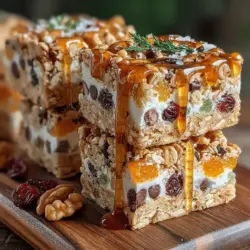
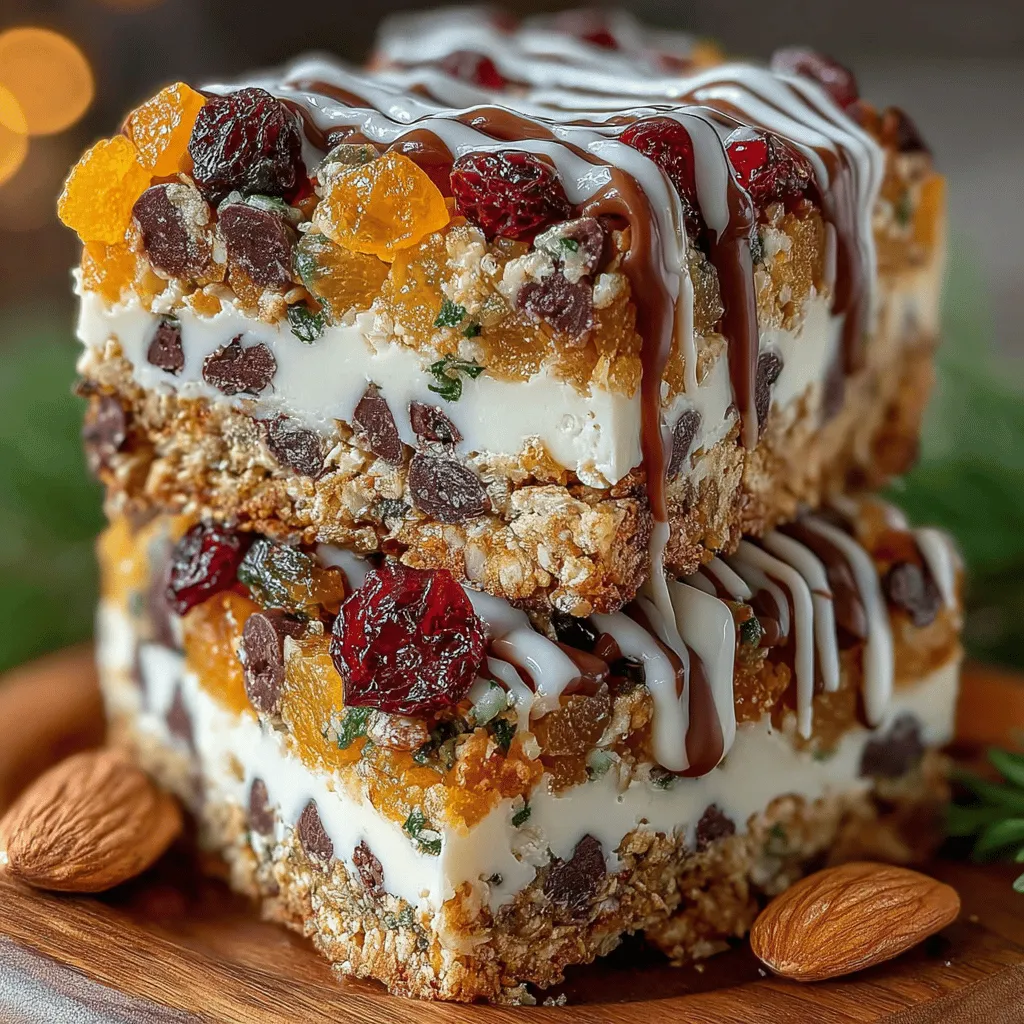
Slicing and Serving
Once chilled, it’s time to slice your Trail Mix Crunch Bars into uniform pieces. Use a sharp knife and cut the bars into squares or rectangles, depending on your preference. For best results, clean the knife between cuts to ensure neat edges.
Serving options are versatile; enjoy them as they are, or wrap them individually for on-the-go snacking. You can also pair them with fresh fruit, yogurt, or a smoothie for a complete meal or snack.
Storage and Shelf Life
To maximize the freshness and lifespan of your Trail Mix Crunch Bars, proper storage is essential. Store them in an airtight container at room temperature for up to one week. If you want to extend their shelf life, consider refrigerating them, where they can last up to two weeks.
For longer storage, you can freeze them. Wrap each bar in plastic wrap and place them in a freezer-safe bag or container. They can last for up to three months in the freezer. Just be aware that refrigeration and freezing can impact the texture over time; while they remain safe to eat, they may become slightly softer or lose some crunchiness.
Health Benefits of Trail Mix Crunch Bars
Trail Mix Crunch Bars are not only delicious but also a nutritious option that fits seamlessly into a balanced diet. Packed with whole grains, healthy fats, and protein, these bars provide sustained energy throughout the day.
Snacking is a crucial aspect of maintaining energy levels, especially for those with busy lifestyles. These homemade bars can help bridge the gap between meals, preventing energy crashes and keeping your metabolism steady.
Additionally, mindful eating is easier when you control the ingredients in your snacks. By making your bars, you can adjust the portion sizes and ingredients to fit your dietary needs, avoiding hidden sugars and unhealthy fats often found in store-bought snacks.
Customization Ideas
One of the best aspects of Trail Mix Crunch Bars is their versatility. There are countless ways to customize your bars based on dietary restrictions and personal preferences.
For those with nut allergies, consider using seeds like sunflower or pumpkin seeds as a substitute for nuts. You can also add flavor enhancements—spices like cinnamon or nutmeg can elevate the taste profile significantly.
If you’re looking to boost protein content, consider stirring in protein powder, or for a tropical twist, add coconut flakes. Sweeteners can also be modified; try agave syrup, brown rice syrup, or even dates for a natural sweetness.
Conclusion
Trail Mix Crunch Bars are a delicious and versatile snack option that can easily be tailored to fit individual tastes and nutritional needs. They are not just a treat; they represent the joy of creating homemade snacks that cater to personal preferences and health goals.
Experimenting with the recipe allows for creativity in the kitchen, and with a few simple adjustments, these bars can become a staple in your snack rotation. So gather your ingredients and get started on crafting your own Trail Mix Crunch Bars, and enjoy the satisfaction of homemade goodness!