Introduction
Choco-Banana Bliss Pops are the perfect fusion of rich chocolate and sweet, creamy bananas, creating a delightful dessert that appeals to palates of all ages. These frozen treats are not only delicious but also offer a healthier alternative to traditional desserts, making them a fantastic choice for guilt-free indulgence. With their vibrant flavor and satisfying texture, these pops are bound to please everyone at your next gathering or family night.
One of the standout features of Choco-Banana Bliss Pops is their simplicity. Whether you’re a seasoned chef or a kitchen novice, you can whip up this recipe in no time. In just a few easy steps, you can transform basic ingredients into a delectable treat that is as visually pleasing as it is tasty. Perfect for warm summer days or as a fun after-school snack, these pops are a versatile dessert that can be prepared in a matter of minutes, ensuring that you can satisfy your sweet cravings without spending hours in the kitchen.
Not only do they appeal to children with their fun presentation and sweet flavor, but they also satisfy adult cravings for a healthier dessert option. The combination of fruit and dark chocolate offers a delightful balance, making these treats an excellent way to enjoy dessert while still being mindful of health.
Understanding the Ingredients
To create the perfect Choco-Banana Bliss Pops, it’s essential to understand the role of each ingredient in the recipe. This not only ensures the best flavor and texture but also highlights the nutritional benefits that come with each component.
Ripe Bananas
The star of this recipe is undoubtedly the bananas. Selecting ripe bananas is crucial for achieving the best flavor and texture in your pops. Ripe bananas are sweeter and softer, which makes them easier to blend and coat in chocolate. Nutritionally, bananas are packed with potassium, vitamin C, and dietary fiber, making them a wholesome choice for a dessert. Their natural sweetness means you can enjoy a satisfying treat without the need for added sugars, aligning perfectly with a healthier eating philosophy.
Dark Chocolate Chips
When it comes to coating your banana pops, dark chocolate chips are the ideal choice. Unlike semi-sweet chocolate, dark chocolate contains a higher percentage of cocoa solids, which not only provides a more intense flavor but also offers several health benefits. Rich in antioxidants, dark chocolate can contribute to heart health and improve brain function. It also usually has less sugar than milk chocolate, making it a more suitable option for health-conscious individuals. The contrast of creamy banana and rich dark chocolate creates a delightful balance that is hard to resist.
Coconut Oil
Incorporating coconut oil into the melting process of the chocolate is a game changer. Coconut oil helps the chocolate melt evenly and smoothly, ensuring a perfect coating on each banana pop. Additionally, coconut oil is known for its health benefits, including its ability to improve metabolism and support heart health. Its subtle flavor complements the chocolate and banana, adding a hint of tropical richness that enhances the overall experience of the pops.
Chopped Nuts
For those looking to add an extra crunch to their Choco-Banana Bliss Pops, chopped nuts are an excellent addition. Whether you choose almonds, walnuts, or pecans, each nut variety brings its unique flavor and nutritional profile. Nuts are an excellent source of healthy fats, protein, and various essential nutrients. They not only enhance the texture of the pops but also contribute to a satisfying crunch that pairs beautifully with the creamy banana and smooth chocolate.
Sprinkles (Optional)
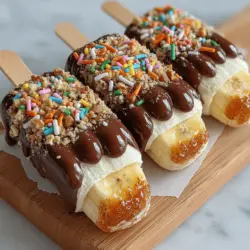
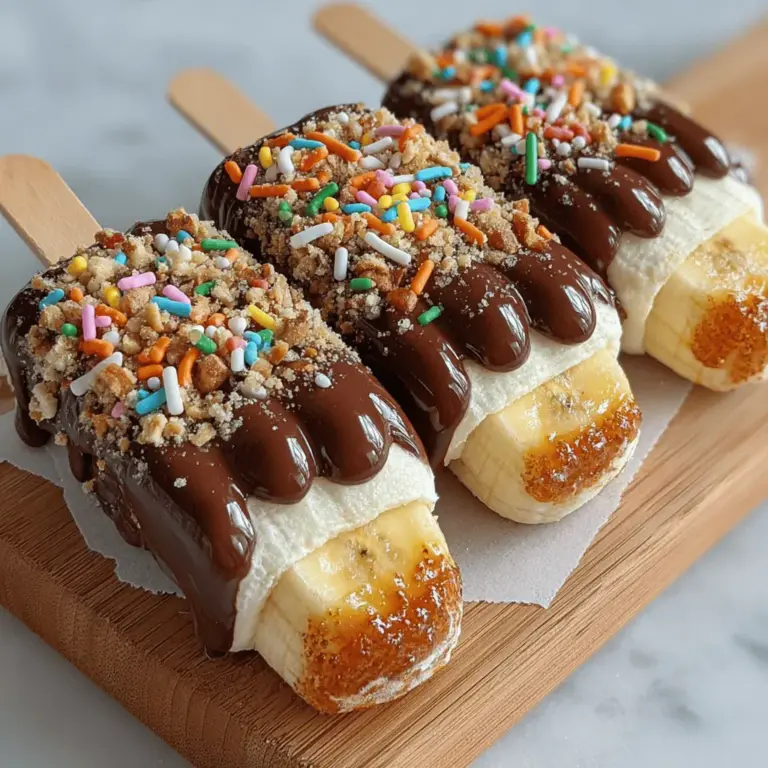
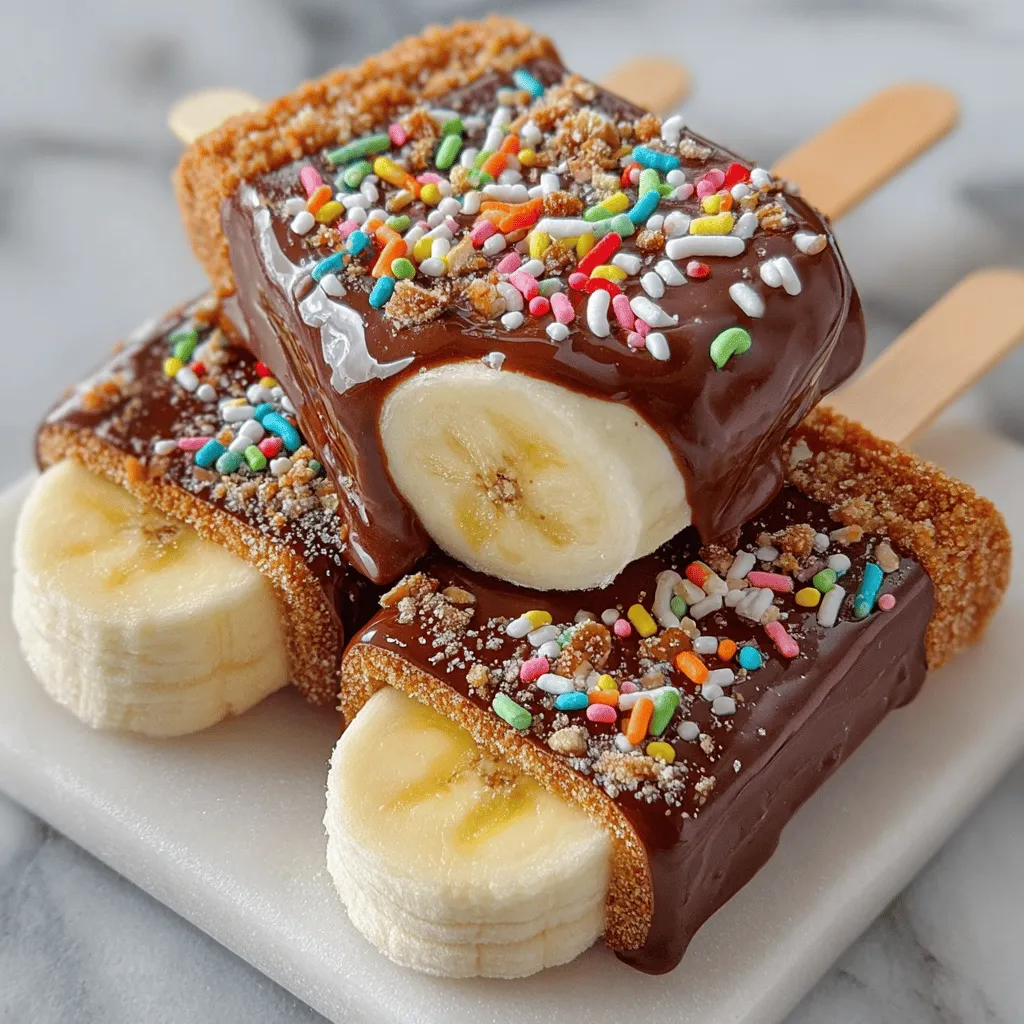
To elevate the fun factor of these pops, consider adding sprinkles. While entirely optional, sprinkles can be a delightful way to make your treats even more visually appealing, especially for kids and festive occasions. There are countless varieties of sprinkles available on the market, from classic rainbow to themed designs, allowing you to customize your pops for any celebration. Their vibrant colors can transform your dessert into a festive treat that’s perfect for parties, birthdays, or simply to bring a smile to someone’s face.
Wooden Popsicle Sticks
Lastly, don’t forget about the wooden popsicle sticks. These sturdy sticks are essential for easy handling and enjoyment of your Choco-Banana Bliss Pops. They provide a convenient way to hold the pops while eating, and their strength ensures that your pops don’t break apart during the dipping or eating process. Opt for high-quality wooden sticks to ensure they can support the weight of the coated bananas without bending or breaking.
Step-by-Step Preparation
Now that you have an understanding of the ingredients and their benefits, it’s time to dive into the preparation of Choco-Banana Bliss Pops. This step-by-step guide will walk you through the process, ensuring that your dessert turns out perfectly.
Step 1: Gather Your Ingredients
Begin by assembling all the necessary ingredients. You will need ripe bananas, dark chocolate chips, coconut oil, chopped nuts, and optional sprinkles. Make sure to have sturdy wooden popsicle sticks on hand as well. This will streamline the process and ensure you have everything at your fingertips when you’re ready to start.
Step 2: Prepare the Bananas
Peel the ripe bananas and cut them into uniform pieces, approximately 2 to 3 inches in length. This size is ideal for easy dipping and allows for even coating. If you prefer, you can also slice the bananas into rounds. Once cut, carefully insert a wooden popsicle stick into one end of each banana piece, ensuring it goes in far enough to support the pop during the dipping process.
Step 3: Melt the Chocolate
In a microwave-safe bowl, combine the dark chocolate chips and coconut oil. The addition of coconut oil will help achieve a smooth and glossy coating. Microwave the mixture in 30-second intervals, stirring in between until the chocolate is fully melted and silky. Be cautious not to overheat the chocolate, as it can seize and become unusable.
Step 4: Dip the Banana Pops
Once your chocolate is melted, it’s time to dip the banana pops. Hold each banana by the popsicle stick and dip it into the melted chocolate, ensuring it is fully coated. Allow any excess chocolate to drip off before placing the dipped pop onto a parchment-lined baking sheet. For added texture and flavor, immediately sprinkle the chopped nuts or sprinkles onto the chocolate coating while it’s still warm.
Step 5: Freeze the Pops
After all the banana pieces have been coated and decorated, place the baking sheet in the freezer. Allow the pops to freeze for at least 2 hours, or until they are firm. This freezing step is crucial to ensure the pops hold their shape and maintain a deliciously frozen texture when served.
These initial steps set the groundwork for your Choco-Banana Bliss Pops, ensuring they are not only delicious but also visually appealing. As you progress through the recipe, you’ll find that the combination of flavors and textures creates a truly delightful treat that everyone will enjoy. Stay tuned for the next part of the article, where we will explore additional variations, tips, and serving suggestions for these irresistible pops.
Preparing the Bananas
To create delicious Choco-Banana Bliss Pops, the first step is to properly prepare the bananas. Select ripe bananas that are firm but slightly soft to the touch for optimal sweetness and texture. Here’s how to prepare them:
1. Peeling the Bananas: Start by peeling the bananas carefully. Hold the banana at the stem and gently pull down the peel. Avoid squeezing the banana too hard to prevent bruising.
2. Cutting the Bananas: Once peeled, cut each banana into halves or thirds, depending on how long you want your pops to be. Typically, cutting them into 3-inch sections works well for popsicle sticks.
3. Inserting Popsicle Sticks: Take a popsicle stick and insert it into the cut end of each banana piece. Push the stick in until it’s secure but not piercing through the other side. A gentle twist while inserting can help create a snug fit without splitting the banana.
By preparing the bananas in this way, you set a solid foundation for your Choco-Banana Bliss Pops, ensuring they hold together beautifully once frozen.
Freezing Process
Freezing is a critical step in the creation of Choco-Banana Bliss Pops. This process not only solidifies the bananas but also enhances their freshness and flavor. Here’s how to effectively freeze your banana pops:
1. Spacing the Bananas: After inserting the popsicle sticks, place the banana pieces on a parchment-lined baking sheet. Ensure that they are spaced apart, with at least an inch between each piece. This spacing is crucial for even freezing and prevents the pops from sticking together.
2. Freezing Duration: Place the baking sheet in the freezer for at least 2 hours or until the bananas are completely frozen. This ensures that they will be sturdy enough to handle the chocolate coating without becoming mushy.
By ensuring proper spacing during the freezing process, you’ll achieve perfectly frozen pops that are easy to coat in chocolate.
Melting the Chocolate
The next step is melting the chocolate, which can be done using different methods depending on your preference. Here are the best practices for each:
Microwave Method
1. Chop the Chocolate: Start by chopping your chocolate into small, uniform pieces. This helps the chocolate melt evenly.
2. Microwave in Intervals: Place the chopped chocolate in a microwave-safe bowl. Microwave the chocolate in 30-second intervals, stirring in between. This prevents burning and ensures smooth melting.
3. Final Stir: When the chocolate is mostly melted, remove it from the microwave and stir until fully melted and glossy.
Stovetop Method
1. Use a Double Boiler: If you prefer using the stovetop, set up a double boiler by placing a heatproof bowl over a pot of simmering water.
2. Melt Slowly: Add the chopped chocolate to the bowl and stir continuously until smooth.
3. Avoid Water Contact: Ensure that no water splashes into the chocolate, as this can cause it to seize up.
Whichever method you choose, ensure that the chocolate is melted to a smooth consistency, ready for coating your banana pops.
Coating the Banana Pops
Once your bananas are fully frozen and the chocolate is melted, it’s time to coat the banana pops. Here’s how to achieve an even chocolate coverage:
1. Dipping Technique: Hold the popsicle stick and dip the banana into the melted chocolate, ensuring it’s fully submerged. Allow the excess chocolate to drip back into the bowl.
2. Using a Spoon: If you prefer, you can use a spoon to drizzle melted chocolate over the banana pops instead. This method allows for more control and may help achieve an even coating.
3. Managing Excess Chocolate: If too much chocolate clings to the banana, gently tap the stick on the edge of the bowl to remove the excess.
This careful coating technique will help create a smooth, even layer of chocolate that hardens beautifully once frozen.
Adding Toppings
To make your Choco-Banana Bliss Pops even more delightful, consider adding toppings. Here are some creative ideas:
1. Nuts and Seeds: Chopped almonds, walnuts, or pistachios add a crunchy texture.
2. Shredded Coconut: Rolled in shredded coconut after dipping provides a tropical flair.
3. Sea Salt: A sprinkle of sea salt enhances the sweet and savory flavors.
4. Crushed Cookies: Crushed graham crackers or Oreos can create a fun, cookie-like coating.
5. Chocolate Drizzle: For an extra touch, drizzle additional melted chocolate over the coated pops once they’ve set.
Feel free to mix and match toppings according to your taste preferences!
Finalizing and Serving
After decorating your Choco-Banana Bliss Pops, it’s essential to finalize the process:
1. Freezing Again: Place the coated pops back on the parchment-lined baking sheet and return them to the freezer. Allow them to freeze for at least 1-2 hours until the chocolate is completely set.
2. Serving Tips: When you’re ready to serve, remove the pops from the freezer and let them sit at room temperature for a few minutes. This will make them easier to eat, as the chocolate will soften slightly.
3. Enjoying the Pops: Serve the Choco-Banana Bliss Pops on a platter or individually wrapped for gatherings. They’re perfect for parties, as a fun dessert option, or a refreshing snack on a hot day.
Nutritional Information
These Choco-Banana Bliss Pops not only satisfy with their delicious flavor but also provide a healthy treat option. Here’s a nutritional breakdown per serving (one pop):
– Calories: Approximately 150
– Total Fat: 8g
– Saturated Fat: 4g
– Carbohydrates: 20g
– Sugars: 12g
– Protein: 2g
Health Benefits
Incorporating fruits like bananas in desserts offers several health benefits, including:
– Rich in Nutrients: Bananas are high in potassium, vitamin C, and dietary fiber, contributing to overall health.
– Dark Chocolate Benefits: Using dark chocolate adds antioxidants and can improve heart health when consumed in moderation.
This dessert provides a delightful balance of sweetness and nutrition, making it a guilt-free indulgence.
Storage and Shelf Life
To enjoy your Choco-Banana Bliss Pops for an extended period, proper storage is essential:
1. Freezer Storage: Store the pops in an airtight container or freezer bag to prevent freezer burn. If stacking them, separate layers with parchment paper to avoid sticking.
2. Shelf Life: When stored correctly, these bliss pops can last in the freezer for up to 2-3 months without compromising quality.
3. Texture Maintenance: Avoid prolonged exposure to air to maintain the texture and flavor of the pops.
By adhering to these storage tips, you can enjoy your Choco-Banana Bliss Pops whenever the craving strikes!
Conclusion
Choco-Banana Bliss Pops are a delightful and satisfying treat that brings joy to both the maker and the eater. This recipe offers a simple yet versatile dessert option that can be enjoyed on various occasions, from casual family snacks to festive gatherings.
What makes these bliss pops truly special is their combination of healthy ingredients and sweet flavors, providing a perfect alternative to traditional desserts laden with sugar and additives. The preparation process is fun and engaging, allowing for creativity with toppings and decorations.
By making Choco-Banana Bliss Pops, you not only treat yourself and your loved ones to a delicious dessert but also incorporate nutritious fruits and dark chocolate into your diet. So gather your ingredients, unleash your culinary creativity, and enjoy the blissful experience of making these delightful pops!